Wednesday, February 15, 2012

Simple Process Model

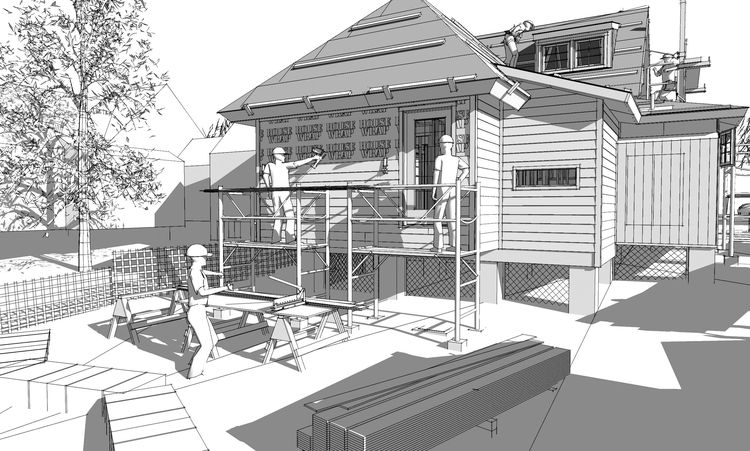
SketchUp models are easily used to animate construction phases. They are quick to set up and can be important in illustrating a schedule or particular sequence of construction that might be critical to a bid or negotiation. Here’s an example (with no sound):


The animation was set up in five steps:

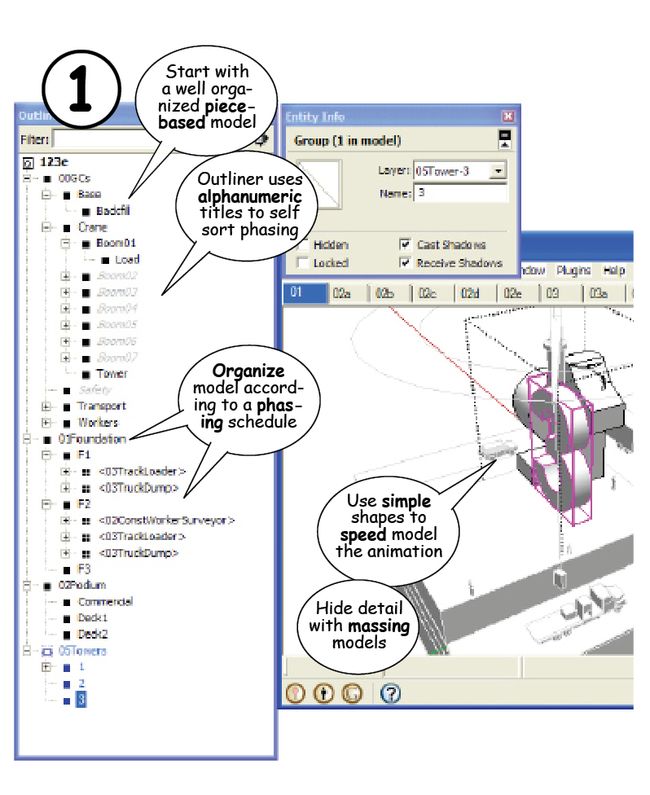
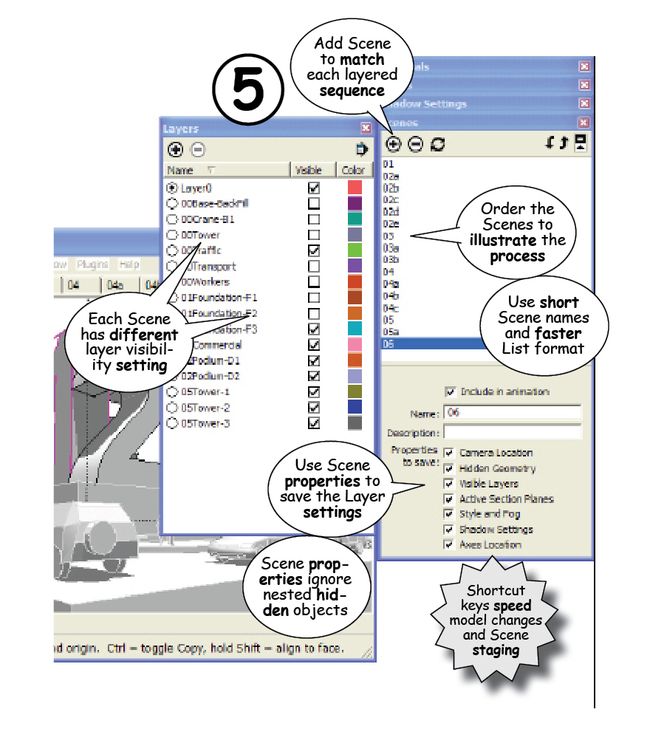
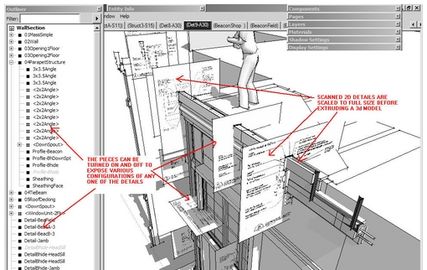
1. Organize the pieces in the Outliner. Start with a well organized construction model (use the 1, 2, and 3 method in the previous articles). Pieces should be grouped and nested according to phase and subcontracts and named alphanumerically so they self-sort in the Outliner. To preserve the original model, use Save As to save a version of the file for the animation.

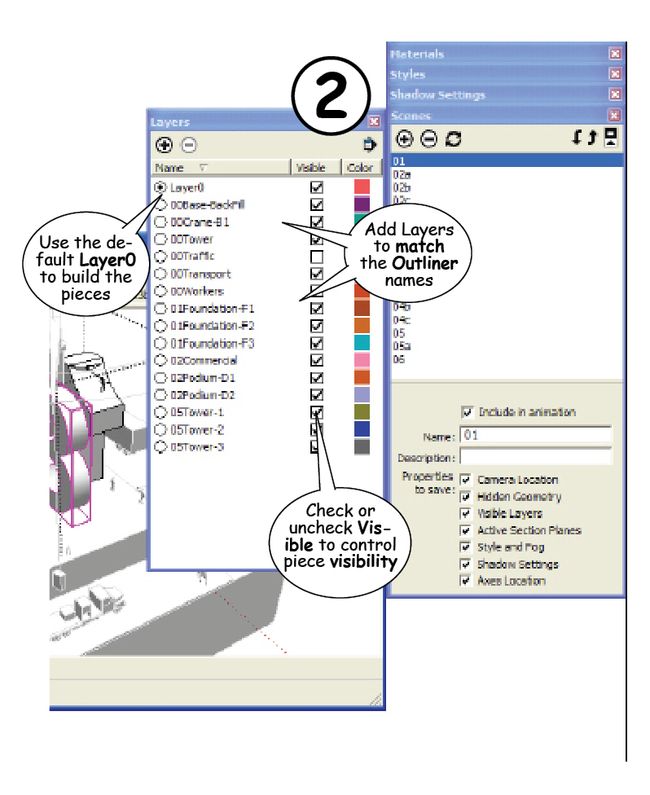
2. Add Layers for control objects. Add Layers to match the alphanumeric names of the pieces, Groups, or Components whose visibility you want to control.
 
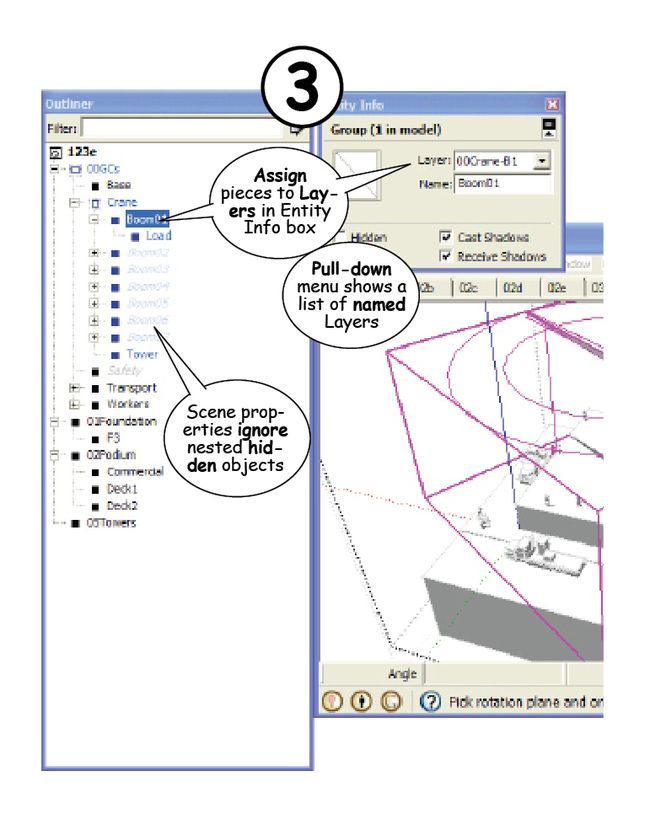
3. Assign pieces to Layers. Select the control object in the Outliner, then use the pull down menu in the Entity Info box to assign it to a corresponding Layer.

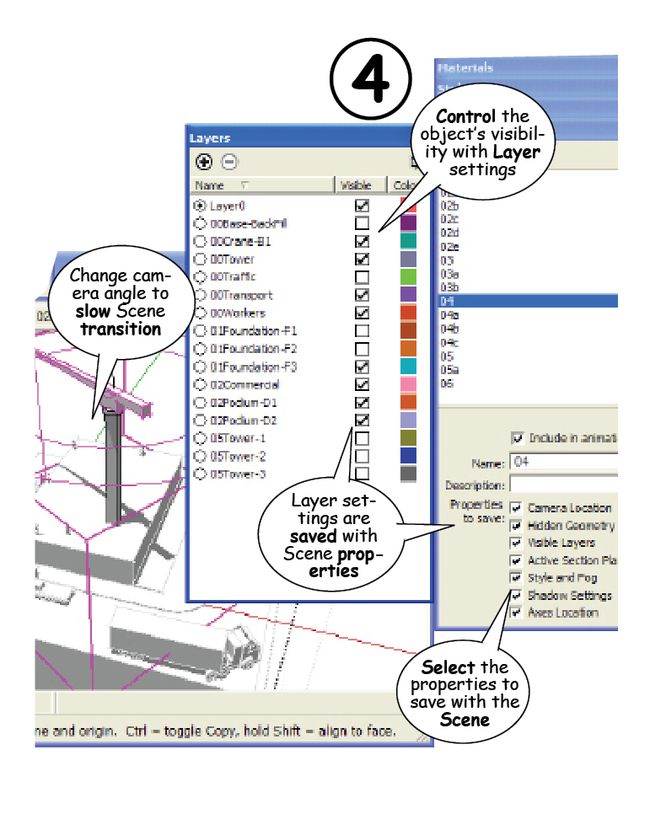
4. Set up Layer visibility and Camera. Check or uncheck “Visibility” in the Layers dialog box for each Scene. Change the camera angle, even if only slightly to slow the animation down. Remember you can set the seconds of the transition time between Scenes with the Windows > Model Info > Animation settings -- use at least 5 seconds with no delay time between Scenes.

5. Add the Scene. When the Layers and camera angle are set, click to add the Scene to the sequence. You can add more Scenes and reorder them in the animation with the Up and Down arrows at the top of the Scenes dialog box. Test the animation by clicking through the Scene tabs or the names in the Scenes dialog box before playing the final animation for export or recording. 05: Test SketchUp Scenes  
SOME TIPS:
a. Use simple shapes with minimal detail. Increase detailed Scenes later. 
b. LayerO is the default. Only assign Layers to control visibility. 
c. Shortcut keys are critical to fast and simple model construction. 
d. Hidden pieces within a group are not recognized by the Scene property settings. .

Thursday, January 12, 2012

Simple as 1, 2, 3

SketchUp is not a BIM modeling program. It does not format components or tabulate descriptions, there is no related data assignment, it doesn’t really work well across multi-platforms, it will not generate analytical reports and it will not automatically or even semi-automatically export a 2D drawing. And it is definitely not a drafting program -- though it will produce a great set of construction documents -- if you know what you’re doing.

It’s not about BIM At the same time, anyone can use SketchUp to build a detailed 3D model. Users include high end designers who render buildings in some pretty amazing ways, plus thousands who use SketchUp to visualize space, color, form, and shadow, lay out a stage, storyboard a movie, graphically illustrate a narrative, build a game, or teach almost any subject from K through 12 (and 13-25).

Insitebuilders-Fig1, Blog120112 SketchUp Scenes 

At the same time, no real constructor needs a model to visualize a set of 2D construction drawings -- it’s not that hard. Students even learn to imagine space and draft 2D floor plans, elevations, and sections in junior high school – though they prefer building 3D models.

Construction modeling is process modeling Important is that the real potential of construction modeling is in simulating a process. A construction model animates time. Here are some recent examples:
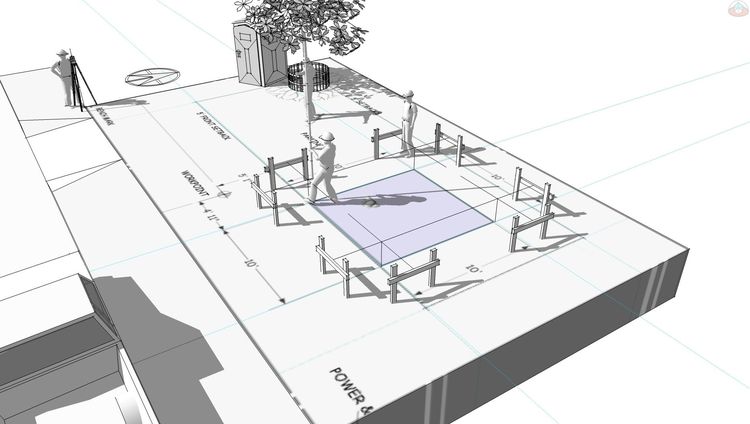
  • Site utilization planning (SUP), mobilization, and startup
  • Tricky lifts or placement of concrete, steel, and air handlers
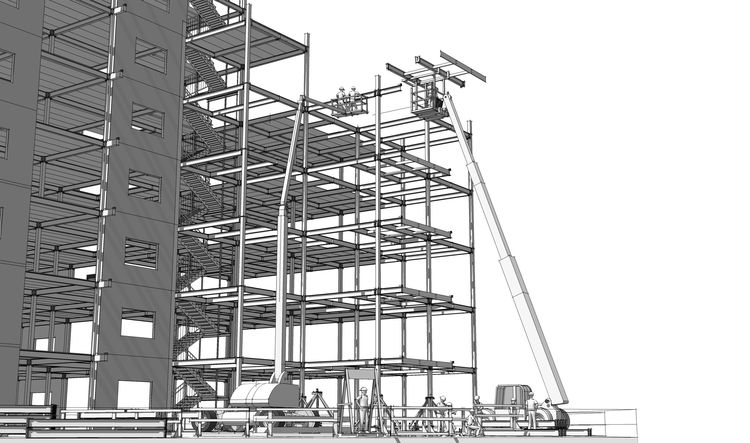
  • Sequence safety lines while decking a high rise steel frame
  • Coordinate labor & material as floor phases, 36 story build
  • Simulate safety changeovers in placing fall protection
  • Designate safety zones and restricted areas changeovers
  • Simulate stair & deck installs on fast track steel frame
  • Determine distances, timing, staging, & material movement
  • Phase and process demonstrations and method sequencing
  • Scale safety zone markers for overhead material movement
  • Coordinate move-on, staging, & subcontract start-up
  • Scale a lay-down to maximize temporary dry storage
  • Crane arcs into storage areas and placement to grid lines
  • Most of you get it….it is not about BIM, drawings, or design
Insitebuilders.com-Fig3, Blog120113 - Process simulation
 
Simulate process as easy as 1, 2, 3
  • Step 1: Think out of the box, everything comes from a box.
  • Step 2: Inferences & guides to assemble a piece based model
  • Step 3: The Outliner and components control time captures
Once built, a static piece-based model can then be deconstructed to illustrate a process as a clickable series of steps or phases, a video that moves from place to place to record different views of an assembly process, or an animation that both anticipates and simulates movement on the jobsite.

Here are three simple examples to try:  

Clickable Scenes


Scene Properties used to set camera location, field of view, time/shadows, hidden objects, layers, and annotations. Click here to download the model.  

Video Capture


Animation settings used to set delay and transition between Scenes. Video then exported as a movie or captured with one of several free video capture programs. Click here to download the model.  

Motion Capture


Use the same scene by scene animation technique film makers use to capture CGI motion. Click here to download the model.
.

Tuesday, December 13, 2011

#3 The Outliner Organizes the Process

The real advantage of SketchUp as a construction modeler is that it can quickly illustrate or animate any sequence of events from a piece-based assembly.  Notes and dimensions are easily added to exports and the results inserted into working documents, presentations, and email during an ongoing construction process. 


Review Steps #1 and #2
#1.  Each piece begins as a box. Start with a rectangle, extrude it, then shape and modify the box to match the specifications for that piece.  When ready, group and name the results.  Make them SketchUp Components when you know there are going to be several identically scaled clones of the same piece. 

#2.  Assemble the grouped objects using one of the many Inferences and Guidelines built into SketchUp.  Use the Move and Rotate tools to snap the pieces into position and the Control key to make copies as you build the model.  

Once the construction model is assembled, it can be quickly staged for Export as a 2D Graphic or Animation using SketchUp’s File Menu.  Deconstruction for illustrations and animations are controlled by the SketchUp Outliner and Scenes. 

The Outliner
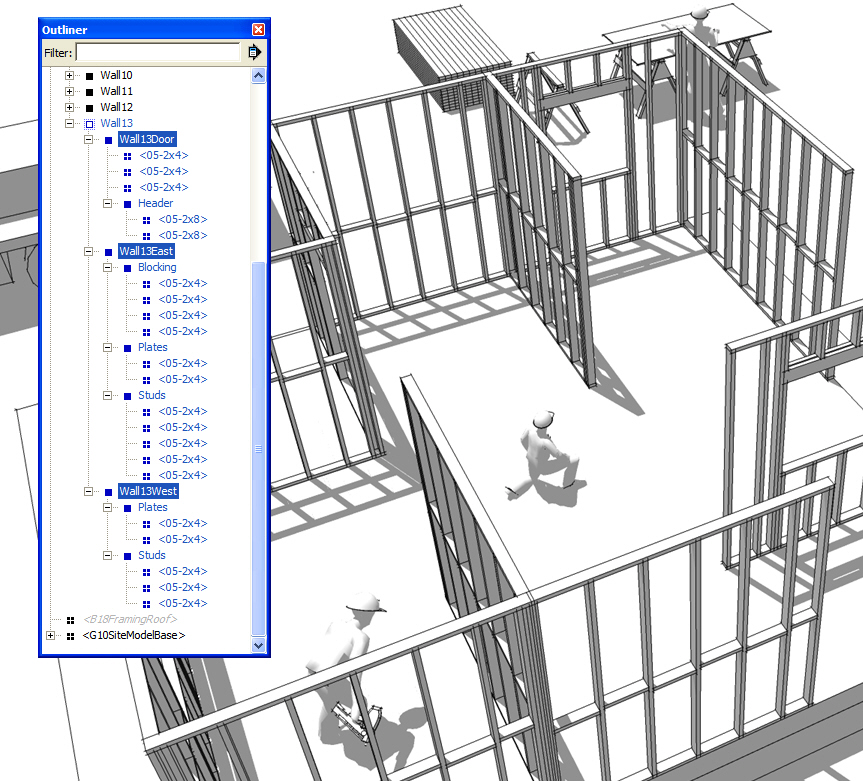
Use the Outliner to nest the named groups into subassemblies that represent subcontracts or sequences that will be important to the processes you may want to illustrate.  


Group the pieces by selecting them in the Outliner with the Shift or Control key.  The Shift key lets you select a series of pieces and the Control key allows you to pick and choose the pieces you want to be in the nested group.  Once selected, use the Make Group command in the Edit Menu and immediately name the new group.  A Shortcut key makes it possible to group objects by pressing a single key.

Once a group is formed in the Outliner, you can drag pieces in and out of that group, double click a name in the Outliner to edit that piece in the 3D model, or combine and reorganize several groups into more complex subassemblies. 

Setting up the Scenes
Use the Orbit and Pan tools to position the camera angle.  Then select any piece or group in the Outliner to Hide or Unhide it and change its visibility for each Scene.  


When ready, use the “ + “ symbol at the top of the Scenes Dialog Box to add a Scene along with the “Properties to save” with that Scene.  Scene names and descriptions help identify content in the Scene, and the “Include in animation” check box will schedule the Scene for export to an animation.  Transition and delay settings are found in SketchUp’s Model Info Dialog Box in the Window Menu.


Annotations and dimensions can be added to each Scene.  You can also capture or Export the Scenes as a 2D Graphic or Animation for further editing in a draw or image editing program, or insert them directly into a working document.

Controlling the visibility or motion of individual pieces in the subassembly is a little trickier, I’ll cover that next time.

Tips
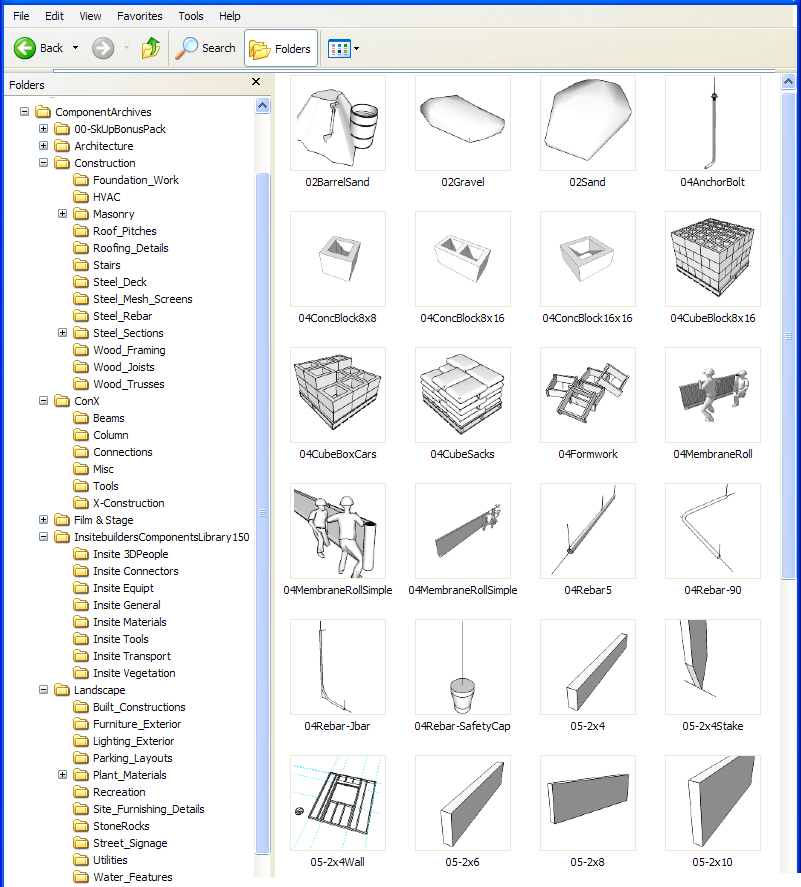
Use a library.  Every piece only needs to be made once when it’s saved to a library.  This means after a couple of models, rapid assembly is possible because you simply drag and drop the pieces into the model from your own collection of construction materials.

Annotate the images.  Use a Draw program to edit and annotate exported graphics.  A free version is included in OpenOffice, or use any of the many free screen capture and image editors found at Only Freewares.  Faststone and PicPick are probably the easiest to use free programs for image captures and quick annotations.

Export animations.  You’ll find the Export Animation feature in the free version of Google SketchUp produces a pretty basic low-resolution animation.  Check out one of the many video capture programs found at Freeware Home when better results are important.  I use the free version of CamStudio for AVI movies and Wink for Flash animations.

Thursday, November 10, 2011

#2 Piece-based Assembly

A 3D construction model starts by first “fabricating” the pieces for the construction and then assembling them exactly as they would be put together in the real world. You can make the pieces as you build the model, or copy and paste them from any previous models. Inferences and guidelines simplify the assembly and the final quality of the construction.   

SketchUp’s Components or Groups?
The key to fast construction modeling is to keep the pieces named and organized so that they are readily available for both field changes and new constructions. The best way to keep a large collection of proprietary pieces organized is in a library folder on your hard-drive.
Insitebuilders - SketchUp Component Library
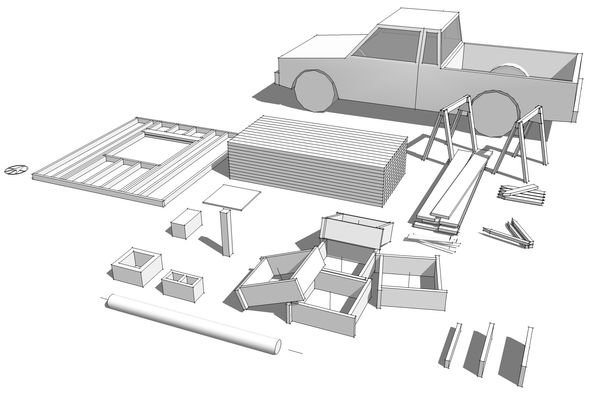
Alternatively, for some projects, you might want to set up a virtual staging area in the same or a separate SketchUp model file. Lay-down yards or staging areas help visually control materials and manage inventory. 

Pieces you drag into a model from a library folder are always Components, while pieces you copy from a virtual staging area can be either Groups or Components. The difference is important because Groups can be edited without affecting copies of the group in the same model. But Components must be made “unique” so they can be edited without affecting their clones or matching copies.

For a construction model, minor changes to a series of Components can quickly overwhelm even a simple piece-based assembly. It’s much faster to Explode, Group, Edit and rename the Component as a new Group, especially if you use the Outliner to track a materials list.
Explode, regroup, and rename  

Built-in Inferences
Inferences, as visual hints in SketchUp make it possible to quickly assemble the pieces. There are three basic types of Inferences that are important to construction modeling:

1. First, there are the Inferences found on the body of the piece itself. These include edges, faces, midpoints, and corners. Each is a snap point for one of SketchUp’s tools.
Typical Inferences

Hover over the piece with the Move or Rotate tool to see inference hints. Then click to snap the tool to that position and start the command sequence.

2. Motion Inferences are red, green, or blue dashed lines that become visible as you Move or Rotate a piece parallel to a SketchUp axis. The Shift key constrains the motion. Press the left, right, or up arrow key to lock movement to an axis. The Control key is used to leave a copy.
 
Typical Assembly

3. Reference Inferences are similar to motion Inferences. They display a dotted line when two Inference points are aligned. Touch the reference Inference point with the cursor while moving or rotating a piece into position to let SketchUp know the desired alignment. Here’s where the Shift or arrow keys are often necessary to constrain the move.  

Centerlines and guidelines
To assemble cylinders (pipes, tubes, and fittings) use mating extensions. The extension can be a projection from the centerline of the piece or any other axis important to the assembly. A fixed length extension makes it possible to quickly join their endpoints and then move the pieces together.
 
Extension lines

Guidelines are necessary to ensure the quality of the final construction in the same way stringlines and chalklines are required in the field by any good builder. They act as temporary references for site layout, as well as intersecting snap points to locate plates, studs, and rafters. Guidelines are also important to center window and door frames, position equipment and furnishings, and install parts of a building’s system.
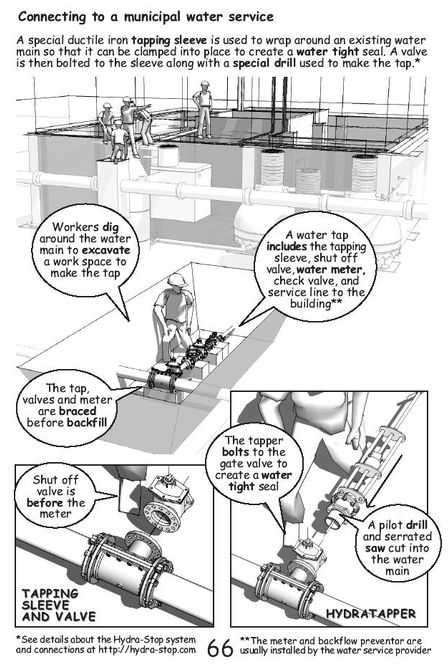
Insitebuilders - Being SUSTAINABLE, page 66  
Piece-based process model
When pieces are assembled and tracked in virtual construction in the same way as they would be on a jobsite, the sequence and scope of the work is automatically built into the construction model. And when these same pieces are nested into sub-assemblies, phases, and sub contracts in the Outliner, their visibility can also be controlled. This makes it possible to both illustrate and animate the scope of the work, adding new potential to your practice and your market presence as a builder and construction manager.

ConXtech: A Revolution in Steel Framing Systems

.

Thursday, October 13, 2011

#1 Think Out of the Box

The key to SkUp as a construction modeler is to think out of the box. Unlike a more complicated BIM or solid modeling program, the free version of Google SketchUp is a simple and easy to use surface modeler. That means it’s very quick to make, modify, and assemble the pieces of a building or other structure. Important though is that it’s this piece-based assembly, rather than a single-shaped static-design model, that makes SketchUp a construction communications tool.

It all starts with a box
Almost all of the pieces used in construction are variations on a box. This includes milled and engineered structural members, as well as formwork, foundations, framing and most of the parts found in the building’s mechanical systems.
Insitebuilders - 3D Out of the Box
In SketchUp a box starts with a 2D profile. The 2D profile is then extruded into 3D with the Push-Pull tool. For some objects the profile is shaped or modified with drawing tools before the extrusion.
 
Fabricate for assembly
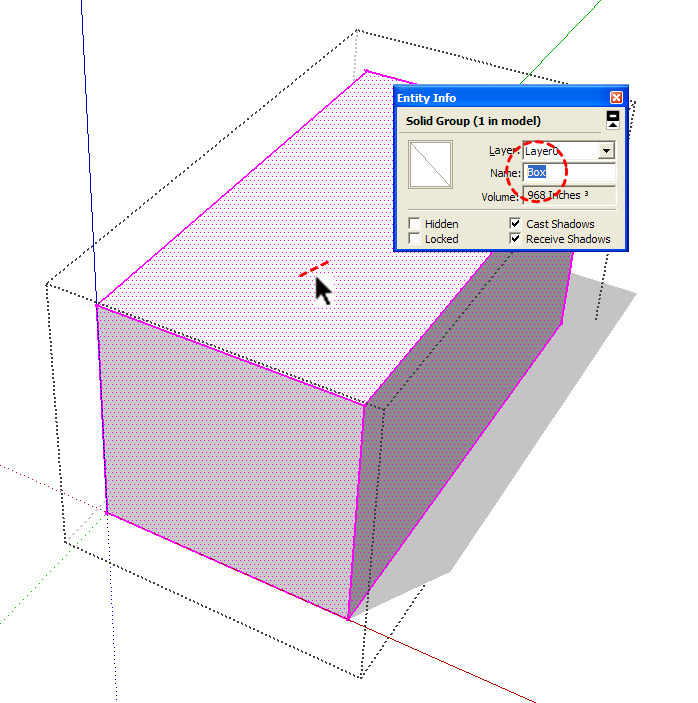
To convert the 3D surfaces and edges of the extrusion into a piece that’s ready for assembly, you need to immediately group and name the box as a distinct object – even before finalizing its shape. To group the extrusion as a single object, triple click any of its surfaces, and select Group from SketchUp’s Edit menu. When you use shortcut keys, the fabricating process is really fast: 1) Triple click; 2) Key-in “g”; and 3) Name the group in the Entity Info box. (See this video for setting up ShortCuts ).Insitebuilders - SketchUp Groups
Groups are quick to make and easily modified with the Edit Group command (or double click). They also save a lot of time when there are only a few instances of the group in the model. For example, use groups for a model base, concrete footing, or part of a building system (See this video to review groups).Insitebuilders - Building Foundation Groups
In SketchUp, you can also make any piece of an assembly a component, but avoid components unless you know you’re going to be using a lot of pieces throughout a large construction model – for example as an array of studs, joists, or the steel in a moment frame.Insitebuilders - Piece-based construction
Components reduce calculation time as you move in and around large assemblies with hundreds of similar pieces. They are also important when an object is going to be saved into a stock library folder. To make and save a component, right click a group and select Make Component, then right click again and select Save As to store it in a file on your computer.  

Component storage
Even a simple construction model uses a lot of the same standard pieces. That means once a piece is manufactured you can save it so it’s ready for assembly in a new model. In other words, you can add to your collection with every model you build. You can also Save As any piece as a component from any another construction model -- hundreds are available to save from the models found in our books alone.
Insitebuilders - SketchUp Component Library 

Scale to fit
Groups can be easily edited in SketchUp, but changes get complicated when you start modifying components. To make things quick and simple, resize components with the Scale tool instead of editing each as a unique piece. For example, framing members can be resized to fit different lengths along a single axis without affecting other copies.

This saves both the time it takes to make a unique component and the confusion that comes with having several minor variations of the same component. Even a few unique components are cumbersome and have little value in construction modeling.

If you need to change a component and only want a few copies of the new version, its much faster to Explode the component and immediate Group and rename it as you build a model. Using shortcut keys again: 1) Select the component; 2) Key-in “e” to explode; 3) Key-in “g” to group; and 4) Rename the new group in the Entity Info box.
 
Stay organized
Of course, construction modeling only works for builders who know how a building actually goes together in the real world – piece by piece. And just like the real-world, when assembly is smooth and everything is coming together quickly, it’s tough to slow down and keep the jobsite and materials organized. At the same time, the importance of a well organized construction model is exactly like a well organized construction project.
Insitebuilders - SketchUp Outliner
As such the SketchUp Outliner acts as both a management tool and a materials list. When the pieces are grouped and named in categories (concrete block, rebar, joists, blocking, and subflooring), they can then be nested into assemblies (stem wall, floor, wall, roof framing, building systems), and these assemblies can then be grouped according to phases or sequences or further subdivided into subcontracts.

This means the pieces in the Outliner can be controlled, counted and correlated to a spreadsheet or schedule. In other words, the construction model can be used to generate materials lists, illustrate parts of the assembly, or animate sequences as slides or videos to communicate the construction process.
Insitebuilders - Staging the Construction Model
Most important, no piece or assembly is ever lost. The model can be deconstructed, resized, and modified for every new project that comes along. The result is a very effective management and marketing tool. One that clearly demonstrates what your company can and will do in an increasingly competitive construction industry. .

Thursday, September 8, 2011

It’s Not About BIM

A construction model is about construction communications and not design. These are simple 3D and 2D models that can be staged and sequenced to illustrate a technical process that many (if not most) designers don’t really understand. It’s simply not what they’re paid or trained to do. Design engineers and architects use complex building information models (BIM) to document the requirements for a completed building. Instead, a construction model is a graphical tool used to visually manage the construction process. The model frees constructors from a tradition of diagrammed dependencies that often leave them on the receiving end of a one way conversation.
Insitebuilders-Field Drawing Example  
A simple visual explanation
For example, imagine what would happen if a builder pulled a pencil stub out of his or her tool belt, grabbed a scrap piece of paper from a trash pile, and used it to sketch a detail for the designer to take back to the office and draft. With that drawing, the builder just stepped back into a time when visual explanations were a natural part of construction management. The “art” of scratching lines on the earth, marking corners with stakes, and notching stones with chisels stands at the Paleolithic beginnings of construction. The earliest construction drawings were prehistoric ideograms, visual gestures used to represent an idea that needed no words or dimensions to layout and complete the construction. Insitebuilders-Ancient Quarry Marks In the field, chisel marks, mockups, strings, and plumbs were used along with chalk, straight edges, and protractors to physically layout the work. These were spontaneous graphical devices that builders used to manage the construction process. Important is that the workers using these visual tools were builders and not designers, markings and models were part of the way buildings and bridges got built.  

Evolution of the explanation
Somewhere in the evolution of construction communications, these early field markings were scaled to paper and parchment and what was once a working drawing became a contract document. As such, field drawings became technical representations, drafted to stand as an abstraction of values and no longer seen as a tool integral to the flow of the work. As a result, diagrams and models that were once used as management tools, drifted away from early builders to become their own kind of technical art. Drawn by skilled draftspersons, first with pen and ink, then vellum and calibrated pencil, Mylar and waxed lead, and eventually vectored lines on a computer monitor, these documents became the dominant voice on the jobsite. Insitebuilders-BIM CAD Drawing Sample
Today drawings and specifications are extracted from BIM models, plotted on reams of paper, labeled as “information,” and distributed almost as an after thought to the subcontractors and workers in the field. What was once a straightforward visual explanation has become a static construct, built to reference the legal requirements of a contract, obfuscated to a point where many experienced designers no longer need to understand how to operate the underlying model. The result is tedious, even for those trained and paid to perform….  

Untangling ideas
Output from the BIM remains as a graphical explanation, but the drawings are now much too deeply entangled in their own internal complexities for any real collaborative input, especially from workers trying to put something together in the field. This means alternatives that could once be considered and grudgingly erased and redrawn by a draftsperson, must now be painstakingly reconstructed within the layers and references of a complex model.
Insitebuilders-BIM Example
As a result, a BIM model is simply not intended to spontaneously respond to new ideas. Instead, it anchors a preconceived approach into a muddle of memory and menus, creating the illusion of a collaborative process. Real-world collaboration only succeeds when simple explanations can be generated on the fly, well before they’re cast into the murky depths of a model. This might still include the stub of a pencil and a scrap of paper, but on a post-modern jobsite, it’s just as likely to include a tablet computer and a few taps on an open-source program, capturing and communicating process-alternatives using a straightforward construction model.
Insitebuilder-construction detail array  
BIM is a design tool
In short, simple construction modeling programs (like SketchUp) do not even come close to challenging the entrenched commitments most firms have for BIM technology. Output generated from a designer’s BIM models are contractual statements of static intent, rendered as a motionless landscape, representing the finished product.

Insitebuilders-Visualize Construction
In contrast, quick and simple construction models are used to generate animations, study sequences, and capture images in order to manage the flow of the work. That means they support real-work in real-time, fulfilling the real-need for immediate visual explanations on a real-world jobsite. The same explanations once found in an ancient tradition of graphic communications in construction.  

See also: 
http://www.historyofinformation.com/index.php?era=-8000
http://citrinitas.com/history_of_viscom/index.html  
.

Wednesday, August 10, 2011

3 Myths of BIM (for Constructors)

With the recent installation of BIM modeling programs after the US government issued their National BIM Standard and the United Kingdom set a mandate for BIM modeling, many construction offices and even a few star struck designers are beginning to see the underlying myths of a building information model (BIM). Most are finding the experience “a cautionary tale of virtual design and construction,” along with many more examples illustrating how BIM is far from the panacea claimed by software providers and their bureaucratic partners.

Insitebuilders-3 Myths of BIM

Myth 1: BIM is Easy

Many of those who think BIM modeling is easy to put into practice in a design or construction office have been blinded by the hype of clever marketing. The truth is, that other than standard (and colorful) objects like columns, beams, and simple gridlines, the real work of documenting a building’s construction is either quietly ignored or passed on to some unwitting subcontractor as part of a bid proposal.

Insitebuilders-3 Myths of BIM

It also doesn’t take long to find that the hardware required to run a BIM program is well beyond the average desktop computer. In addition, the software is myopically tedious and labor intensive, requiring suites of specialized add-ons with mind boggling menus of objects as product placements. This complexity means any hope of successfully extracting information from a model requires a highly proficient operator, a lot of time and money, and a hands-on journeyman level of expertise in building systems installations.

Of course, the very idea of a collaborative approach to coordinating building systems is lost on project executives who have neither the time nor the practical knowledge necessary to teach a CAD operator how to build an installation exactly as it will be placed in the field. No BIM model can anticipate variables of cash flow, scheduling, weather, materials, and the availability of busy subcontractors.

Insitebuilders-3 Myths of BIM
In other words, except for the assembly of a straightforward structural frame or the combination of standard engineered equipment, any potential conflict or interference that might be detected by BIM software depends completely on the construction and modeling expertise of people who know little about bending, welding, or hanging the pieces of a building in the real-world.

Myth 2: BIM is Automatic

Unlike a machined part, a building is an assembly of diverse and interrelated pieces, separated by different trades, expertise, criteria, and rules of thumb. No amount of office collaboration will match the hour to hour decisions made by construction superintendents, foremen/women, and leads on the jobsite.


In the office, the quixotic challenge is to layer two and three-dimensional visual information into a BIM model, while coordinating cross references, sequencing output, and accommodating last minute changes. All with a constantly shifting team of isolated CAD operators. This means the very idea that a technician can simply extract a 2D construction drawing with a straightforward Export command, ignores the frustration that all too often accompanies almost every task that includes a computer. Something always seems to go wrong.

This means, the promise of BIM modeling requires technical skill to operate the software, construction skills necessary to build the model, drafting skills to pick up corrections and changes, and a mind numbing focus on the intricacies of layering useful information into the model’s construction. 2D output must then be manually plotted along with stock specifications and details into a well referenced set of paper-based documents and material lists.

Insitebuilders-3 Myths of BIM

To do this successfully, IT managers must also maintain the technology with constant upgrades, backups, repairs, comprehensive and continuous training, and a collection of proprietary tricks, key codes, and macros that work around long and often convoluted command structures.

Myth 3: BIM is Useful

And after all this extra work, the resulting model file is completely useless to long term facilities management after one or two generations of software upgrades. In fact, the very idea that a facility manager has the time, personnel, or budget, to keep up with the hardware and software necessary to use a BIM model stems from even more imaginative marketing.

First, because even the exact same workstations used to produce the exact BIM model is actually rapidly going out of date as the model is being built. In other words, once the model is finished, funded, put out to bid, and finally gets into the field as part of a contract, it has already been outdated by technical advances in the hardware and software. Everyone knows these programs are constantly evolving: debugged, tweaked, or abandoned simply to encourage sales of new versions. That’s a fundamental truth in the computer industry.

Insitebuilders-3 Myths of BIM

This means the “saved” files downloaded from the original equipment are nothing more than a volatile mix of soon to be antiquated media. Anyone who remembers a cartridge recorder, floppy disk drive, or zip-drive knows it’s just a matter of time before the data on CD/DVDs, hard-drives, solid state, and cloud storage will no longer be useful for future computer devices.

To some the solution may seem to be to keep early software purchases on older computers and maintain proficiency on backwater versions of the program.

Insitebuilders-3 Myths of BIM

But the personnel capable of operating these antiquated workstations efficiently are also volatile. First because a vacation, temporary assignment, or unemployment will reduces proficiency within weeks. In addition, competitive CAD technicians must job-hop to better software or workstations if they sense their current equipment is becoming out of date. They cannot afford to be left behind in a rapidly evolving industry. And those that do stick around are often burned out by boredom and dissatisfaction, having lost the will to keep pace with the treadmill because of years of utter frustration.


The Solution is Simple

The solution to the failures of BIM modeling is a 3D information management tool that does not require a lot of updates or changes, is free for the asking, and doesn’t require a CAD technician to operate. If communication and collaboration is the key to more efficient construction information modeling, what the construction industry needs is a simple, universal, and transparent 3D program that anyone can use on any computer. That’s Google SketchUp – which wouldn’t be FREE without Google.

Mark Carvalho, an early “voice” in 3D modeling software, once articulated a vision for SketchUp as a universal visual-communications tool; one that comes close to being the PDF of 3D modeling. His view was based on the philosophy of Brad Schell, the founder of SketchUp, and the original start-up team’s company motto: "3D for Everyone."

Insitebuilders-3 Myths of BIM

See The Daily CatchUp

Brad envisioned a software program that would match the feel and freedom of working with pen and paper using a simple interface, easy to learn, allowing people to play with ideas in three-dimensions after a few minutes of practice (See Wikipedia). In this way, models could be used to document constructions, simulate sequence and process, communicate alternatives, and be useful to anyone with the click of a mouse or a tap and pinch of the fingers.