Monday, June 16, 2014

HOMEBUILT HOUSE


HOMEBUILT HOUSE: A Vernacular of Uncertainty
Often thought of as squatters, our new book details the work of informal builders piecing together houses on land that others feel they have no right to occupy.
HOMEBUILT HOUSE: A Vernacular of Uncertainty
These houses are built in places where style and design have no meaning. Instead, construction begins with the hands-on challenge of piecing together a physical form using only immediately available materials as form givers.
HOMEBUILT HOUSE: A Vernacular of Uncertainty
This is an architecture sculpted without pretense or plan, governed by indeterminate events, endured in a marginal existence, and resolved according to basic human instincts for shelter and survival.
HOMEBUILT HOUSE: A Vernacular of Uncertainty
For these builders, construction is the focus of a casual process that gives life purpose in its making, sustaining not only an unregulated spirit and resilience, but a sense of pride in a visible expression of autonomy and self-determination.

In the end, there are only a few who share the instincts of an informal builder and have the courage to take on the challenge of building a home of their own.

See also.… . .
.

Tuesday, May 13, 2014

Part 15: Foundation; Laying Block

(Introduction, Syllabus, 1.Prelims, 1-4Precon, 2. Excavation, 3.Foundation, 4.Framing, 5.Roof, 6.Close, 7.MEP, 8.Finish)

Once the masonry materials and equipment are in place, the project is considered staged and ready for the next phase of the construction. Most superintendents will check the project just before their arrival to make sure everything is ready to go, no one wants to upset the masons before they even get started.  

Teamwork
Depending on the size of the project, the masons will work in teams that include at least a journeyman and a person called a hod carrier or hoddie. Though often mistaken for a simple laborer, a good hod carrier is important to the flow of the work because block, brick, grout, and reinforcing have to be placed within reach of a journeyman or apprentice just as these materials are needed.
Foundation Phase – Insitebuilders
Depending on union rules, a master mason might only be important for complex details or to manage additional teams on larger projects. Residential foundations like this one would usually only need to be checked for progress or to coordinate the location of anchors, conduit, or plumbing sleeves that penetrate the stem wall.

Laying Block
A plumb bob is hung from the string line intersection to mark the corners and junctures of the stem walls. The dimensions of the wall should fit a standard 8” module so they can be put together without unnecessary cutting or trimming the concrete block.
Foundation Phase – Insitebuilders
If the lengths of the walls don’t match the size of the standard masonry units, block will have to be cut to fit into the wall’s construction. This adds to the cost of the foundation and creates a break in the joint pattern of the block that is often awkward to handle with a striking tool.
Foundation Phase – Insitebuilders
The masons start in the corners, bedding the blocks to bond with the concrete footing and leveling the first course with a laser or a line level while making sure the corners are square.Foundation Phase – Insitebuilders
As they place the block, the J-bar coming out of the footing is fitted to the hollow core of the block, sometimes bending the rebar slightly to center the reinforcing. Additional lengths of vertical rebar are tied to the J-bar as the wall rises. The hollow cavities will then be filled with grout to stiffen the wall and bind it to the footing.
Foundation Phase – Insitebuilders
The top of the block or a hand level is struck with the trowel to seat the block into the mortar joint and any horizontal reinforcing that might be required. Joints are troweled flush or struck with a concave tool depending on project specifications.
Parging might also be applied in extremely wet conditions to provide a smoother surface for waterproof sealers. Platforms and scaffold make the work easier by bringing each course to a comfortable height. Guardrails are required for fall protection if the wall rises above limits set by construction safety codes.

(To be continued…)  

---------------------------

The material presented in this series has been taken from our book, “How a House is Built: With 3D Construction Models” The book includes annotated illustrations, captioned text, videos, models, and the 2D Preliminaries.

 Insitebuilders.com .

Monday, April 14, 2014

Part 14: Foundation; Stem Walls for a Raised Foundation

(Introduction, Syllabus, 1.Prelims, 1-4Precon, 2. Excavation, 3.Foundation, 4.Framing, 5.Roof, 6.Close, 7.MEP, 8.Finish)

With the site cleared for the next step in the foundation’s construction, a stem wall is needed to support the floor framing. Stem walls make it possible to raise the floor level for storm cellars, basements, or mechanical crawl space.

A raised foundation also changes the profile of a building, reducing potential moisture penetration, mold and mildew, insects and insecticide contamination, and makes it easier to add or modify the house as mechanical requirements change over time. See the website for the Southern Forest Products Association.
Foundation Phase – Insitebuilders
The stem walls and piers could be built using cast-in-place concrete with rigid or insulated forms. Cast concrete walls have the advantage of being a strong monolithic structure in wet or difficult soil and are required by code for earthquake engineering, heavy loads, and some soil, ground water, or site conditions  

Checking the footing
The foundation walls for this building are constructed with standard concrete masonry units (CMU). The concrete blocks are laid using common tools and reinforced with horizontal and vertical steel that is embedded in grout to form an integrated structural system.

Before beginning the wall’s construction, the site is cleared for safety, string lines are replaced on the batter board, and the foundation is checked for compliance with the construction documents prior to finalizing preparations for the work. Verification of existing conditions is especially important when the masonry contractor is not the builder who installed the concrete footing.
Foundation Phase – Insitebuilders
The workpoint is used to check the elevation of the footings and mark the corners of the foundation walls, verifying the string line intersections (see Part 10 Foundation Footings).
Foundation Phase – Insitebuilders
The foundation stem walls extend from the top of the concrete footing up to the bottom of the sill plates that support the structural framing. That means the elevation of the footings is directly related to the reference height of the stem walls and the corresponding elevation for the floor, wall, and roof framing.

Staging the Masonry
To prevent future conflict, some builders require each subcontractor to sign off on an existing installation prior to allowing them to move material and equipment onto the jobsite and start their work. This makes subsequent specialists solely responsible for each step in every phase of the construction.
Foundation Phase – Insitebuilders
Staging for the masons includes lifting pallets of masonry into the excavation and setting up a mixer along with grout/mortar and sand as required. Access to water is of course critical and power may be necessary for cutting tools and rebar bending equipment. Erosion control and safety concerns for the workers are also important.
Foundation Phase – Insitebuilders
As you’ll see in the next post, the walls for this building are designed using standard block sizes and masonry dimensions to minimize cutting and fitting. This means all horizontal and vertical dimensions are specified in eight inch (8”) increments.  

(To be continued…)

---------------------------

The material presented in this series has been taken from our book, “How a House is Built: With 3D Construction Models” The book includes annotated illustrations, captioned text, videos, models, and the 2D Preliminaries.
http://insitebuilders.com .

Monday, March 17, 2014

Part 13: Foundation; Stripping the forms

(Introduction, Syllabus, 1.Prelims, 1-4Precon, 2. Excavation, 3.Foundation, 4.Framing, 5.Roof, 6.Close, 7.MEP, 8.Finish)

Once the concrete is in place, the site should be cleared of tools, equipment, and any debris that accumulated during the pour. Fencing, barriers, and safety controls should be replaced where they’ve been removed and the batter boards and workpoint checked for damage.

Strip the formwork 
It’s also important to remove the formwork as soon as possible, but only as quickly as the weather will allow. In general, stripping immediately makes it easier to remove and clean the forms and allows the concrete to cure evenly. Waiting too long can weaken the concrete because of uneven curing and make it difficult to reuse the forms.
Foundation Phase – Insitebuilders
Unless it’s extremely cold, a chemical reaction occurs that prevents the concrete from freezing, but the footing’s surfaces can also dry out if it cures too quickly. This makes timing critical and it takes experience to know when it’s best to strip the forms.
Foundation Phase – Insitebuilders
Hands-on builders consider the weather and feel the warmth of the concrete before making a judgment as to the best way to protect the concrete as it cures.  

A Different Approach
All of this can be avoided with an interesting innovation in concrete formwork. Of course, it takes a long time in the construction industry to change established methods, but some innovations suggest a particularly logical approach to conventional practice.
Foundation Phase – Insitebuilders
Fabric forms use tensile membranes instead of rigid members. Concrete is contained by the geometry of the fabric, forming structural curves as pure tensile elements and ideal parabolic shapes for foundation footings.
Foundation Phase – Insitebuilders
The fabric also adapts to uneven ground and uses far less material to hold the wet concrete in place. The permeable material also allows the concrete to cure evenly with a smooth finish, reducing labor, transportation, and storage. Better yet, stripping is reduced to stakes, spreaders, and runners that are easily removed and reused in the framing as blocking.
Foundation Phase – Insitebuilders
Trying something new depends on the type and volume of work, design of the foundations, and interests of the builders who might want to give an idea like this a try. For more information, see installation diagrams and videos at www.fab-form.com and an association website at www.fabricforming.org.  

(To be continued…)  

---------------------------

The material presented in this series has been taken from our book, “How a House is Built: With 3D Construction Models” The book includes annotated illustrations, captioned text, videos, models, and the 2D Preliminaries.


.

Thursday, February 13, 2014

Part 12: Foundation; Placing Concrete

(Introduction, Syllabus, 1.Prelims, 1-4Precon, 2. Excavation, 3.Foundation, 4.Framing, 5.Roof, 6.Close, 7.MEP, 8.Finish)

As soon as the rebar and the forms are ready, most building permits will require official approval before concrete can be placed. A code compliance inspector is then scheduled by the builder to visit the site, check the forms and rebar against the permit drawings, and authorize concrete placement with a stamp or signature.
Foundation Phase – Insitebuilders
Unless the foundation is unusually complicated, most inspectors will only take a cursory look at the formwork, spot check some rebar, and sign off without comment, after all most foundations are pretty much the same. But problems occur if the rebar is dirty, rusty, or oily, or the formwork somehow affects public property. Rarely is the inspector concerned about the foundation’s design or engineering, that’s a given.

PrePour Checklist
Good builders use a checklist to make sure the foundation is ready for inspection and anticipate any possible delay. Concerns include a final check of the formwork for gaps, weaknesses, or missing hardware, cleaning the forms and reinforcing, checking the position of sleeves and brackets, and making sure required insulation, expansion joints, and vapor barriers are installed.
Foundation Phase – Insitebuilders
Prior to ordering concrete, it’s important to make sure all the necessary tools and equipment are on site and ready to use. This includes shovels, water, vibrators, spreaders and trowels. High density lighting might also be required on short winter days, especially if there’s any possibility of a delay.

In addition, a safety officer should be assigned to check the weather, designate safe zones, truck routing and staging, mark power lines, check all equipment, and secure the wash down area. The entire site is then cleared of unnecessary tools, trash, and personnel.
Foundation Phase – Insitebuilders

Placing the Concrete
Once the concrete has been scheduled, a biodegradable release agent is applied to the forms to prevent bonding. A concrete pump makes it much easier to move concrete around the site, reducing risk and the number of laborers required for the work, as well as making it easier to spread and vibrate the material once in place.
Foundation Phase – Insitebuilders
The number of concrete trucks depends on the volume of material required, the supplier, and jobsite conditions. For large projects, more than one truck will mean staging the work according to volume calculations and site conditions in order to control joints, minimize waste, and prevent potential contamination from excess concrete runoff.  

(To be continued…) 

---------------------------
The material presented in this series has been taken from our book, “How a House is Built: With 3D Construction Models” The book includes annotated illustrations, captioned text, videos, models, and the 2D Preliminaries. 

Thursday, January 16, 2014

Part 11: Foundation; Footing Reinforcing

(Introduction, Syllabus, 1.Prelims, 1-4Precon, 2. Excavation, 3.Foundation, 4.Framing, 5.Roof, 6.Close, 7.MEP, 8.Finish)

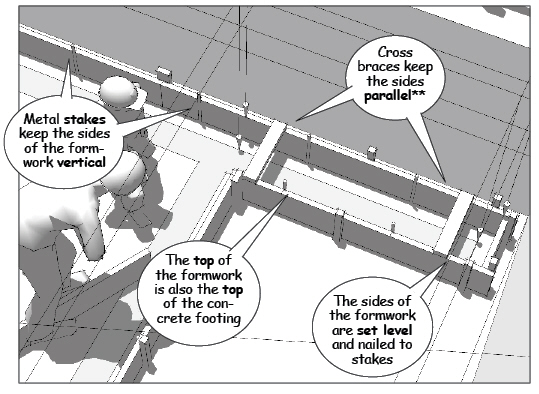
Specialty contractors use reusable forms for their foundations, but for most small projects almost any skilled carpenter can quickly layout and assemble the formwork for a foundation footing.

In this example, the footing formwork is assembled with standard lumber that will be reused in the floor and wall framing illustrated later in Phase 4.
Foundation Phase – Insitebuilders

Pier work
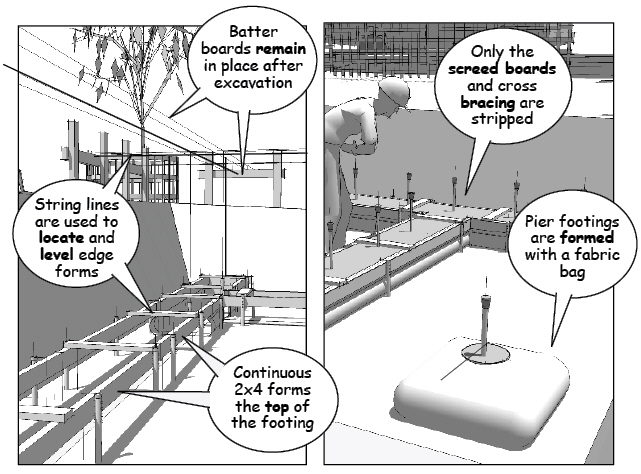
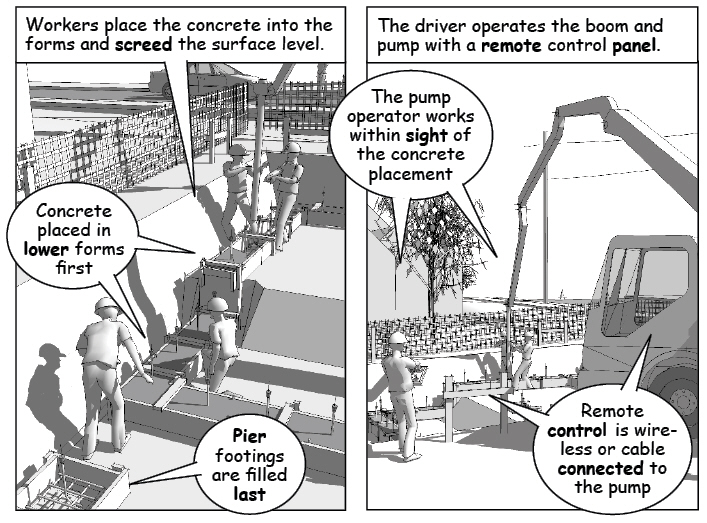
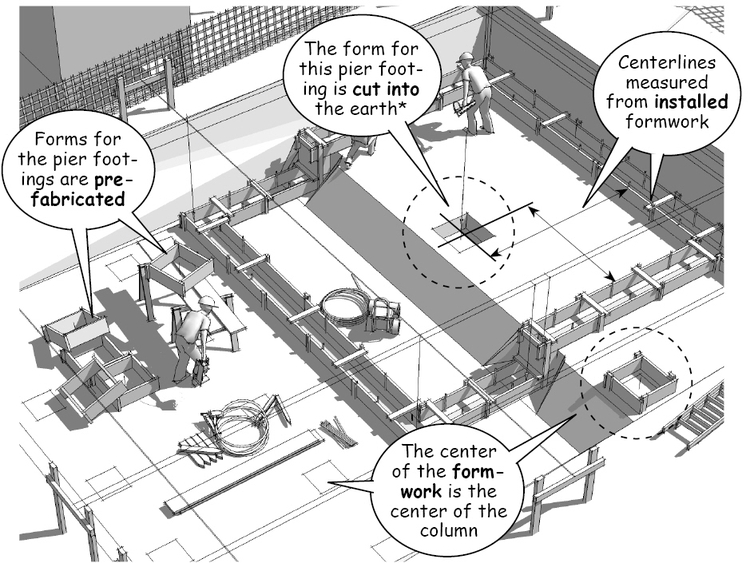
If soil conditions are right, the footings can also be cut directly into the soil as shown for the pier footing on the excavated shelf in the illustration above.

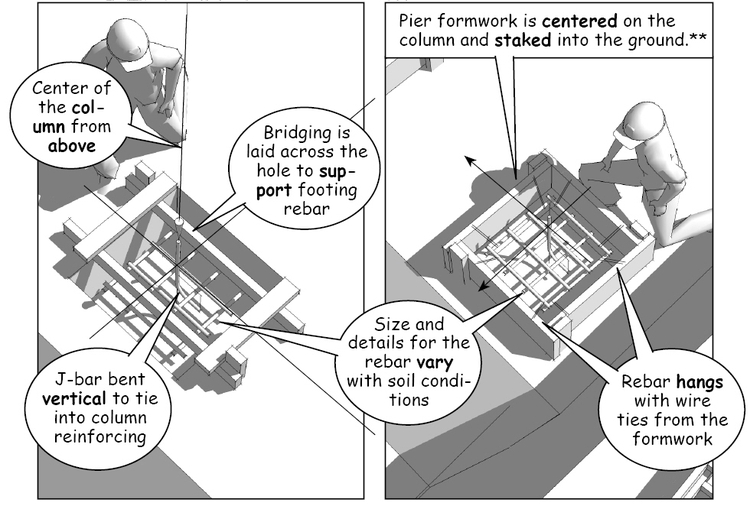
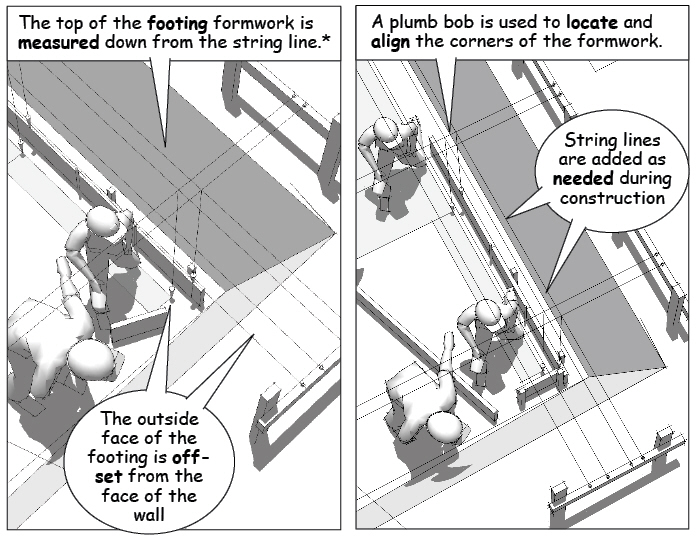
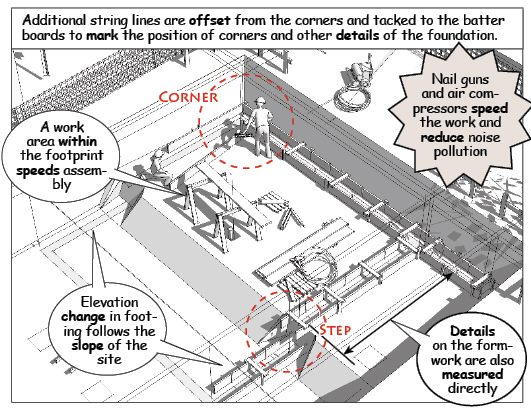
Forms for the rest of the pier footings are prefabricated on site so that they can be centered on the string line intersections marking the column locations, or positioned with a tape measure from the perimeter formwork. The center of the pier footing is the center of the column load coming from above.
Foundation Phase – Insitebuilders
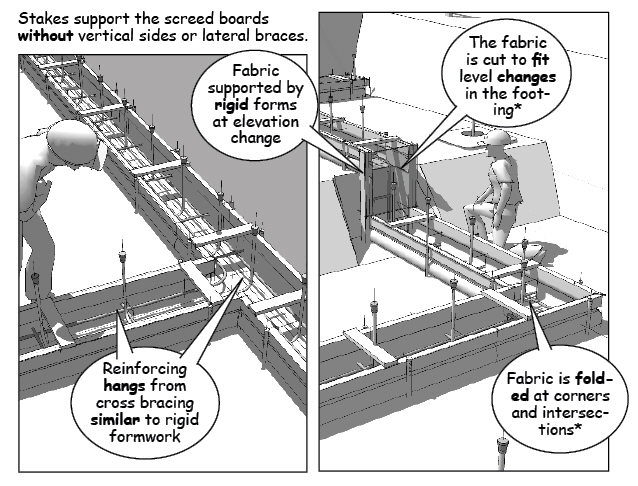
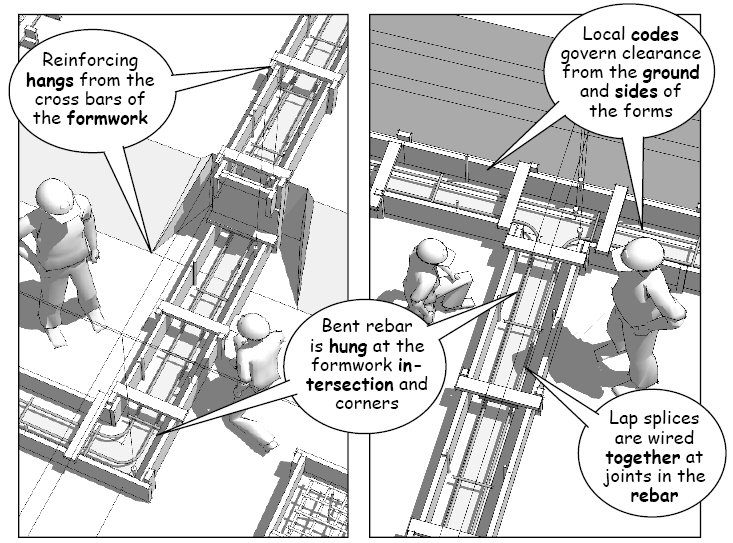
Bridging is used to locate and suspend the concrete reinforcing (rebar) across the top of the open earthen formwork, or from the sides of the prefabricated forms.

For heavily reinforced foundations, some contractors prefer to use light weight plastic “chairs” to hold the rebar up off the floor of the excavation (See Craig’s Concrete Specialties). 
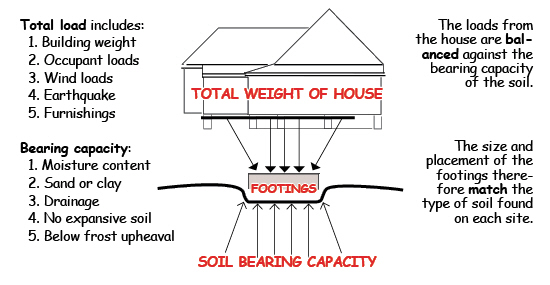
The size and location of the reinforcing varies with soil conditions and the weight to be distributed over the undisturbed surface of the excavation.

Quality control 
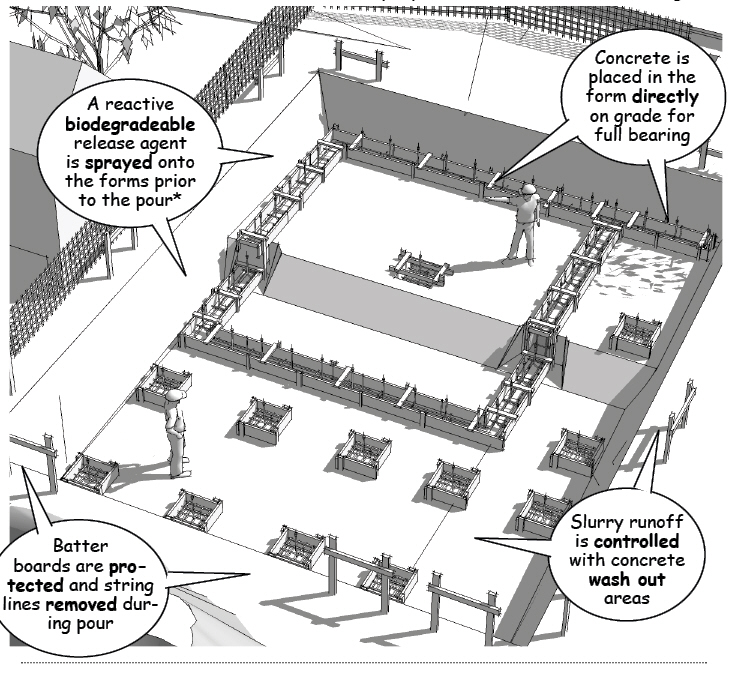
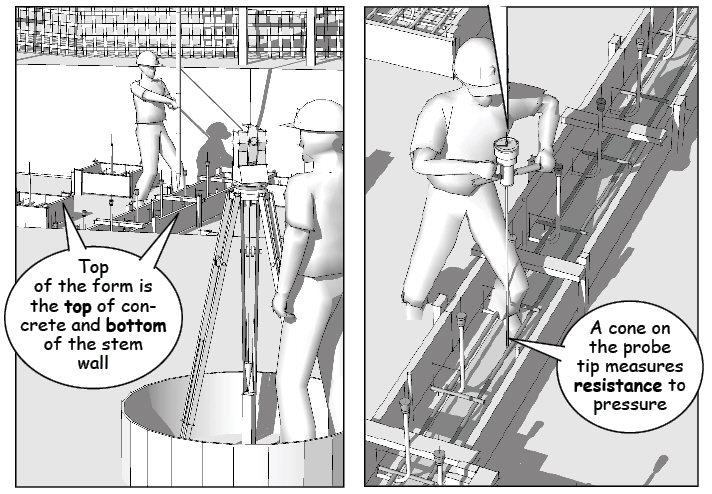
It’s important to check the location and elevations of the footings for accuracy, as well as test soil density to make sure it meets the original engineering specifications. Loose or disturbed soil will sink or compress under the weight of the building.
Foundation Phase – Insitebuilders
Depending on building type and local conditions, some building departments will require certification for the location of the footing, along with penetration test results verifying soil density before authorizing concrete placement.

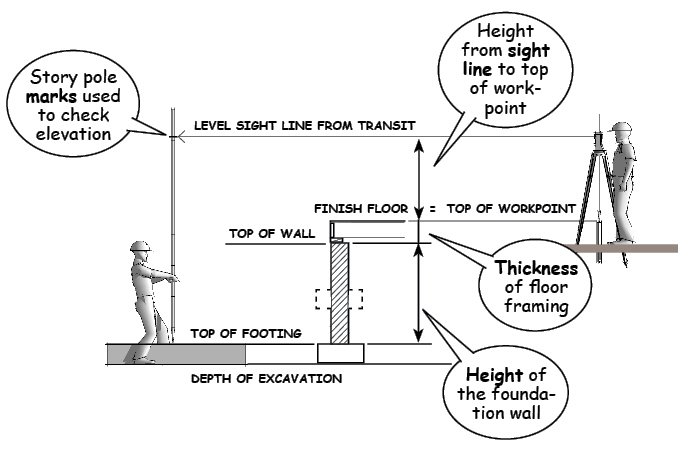
The workpoint is again the primary reference to check the layout and vertical elevations of the footings. It’s easy to see how a level and accurate excavation minimizes unforeseen material and labor costs for all future construction.  

Continuous reinforcing
Standard lengths for rebar are 20 feet, with diameters measured according to increments of 1/8”. In other words, a #4 bar is 4/8” and a #5 bar 5/8”. This means the rebar must be cut and bent in the field to fit in the formwork using a hydraulic tool (similar to this one supplied by Southern Tool).
Foundation Phase – Insitebuilders 
Crossbars are installed to keep the formwork rigid and suspend the rebar. The steel reinforcing is tied to keep it away from the sides of the formwork and up off the ground. Again, chairs or similar spacers may be easier for some builders to install.

Clearances from the ground and sides of the formwork are necessary to protect the rebar and distribute the loads on the foundation once the concrete has cured.
Foundation Phase – Insitebuilders 
The rebar must also be continuous at all intersections and around corners because any gap or break in the length may result in settlement cracking once the footing is under load.

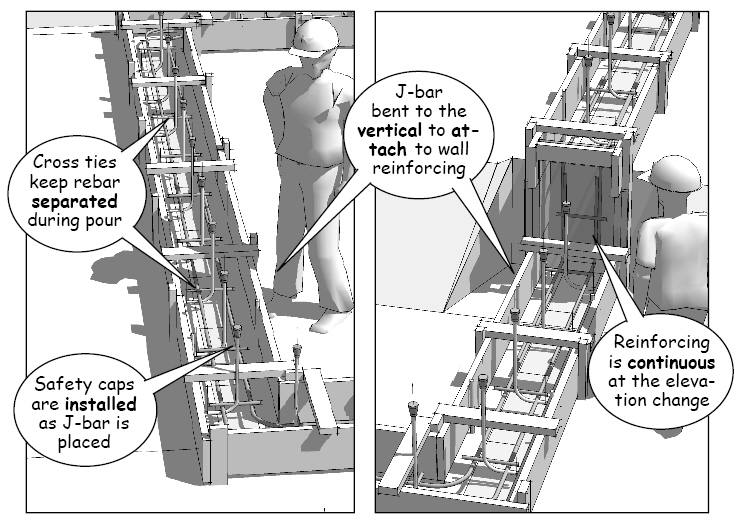
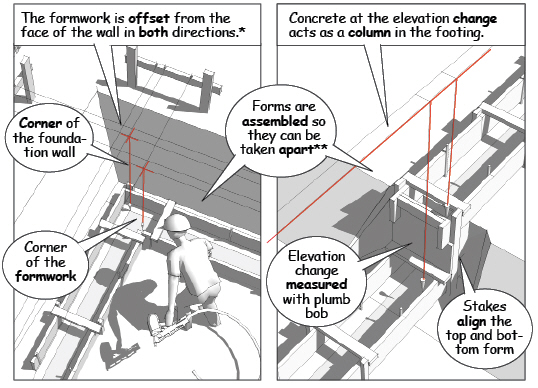
Special attention is also required at any step or change in the footing elevation. Concrete stem walls are formed to fit this step, but for a masonry stem wall, the step should be located so that it fits standard masonry dimensions.
Foundation Phase – Insitebuilders
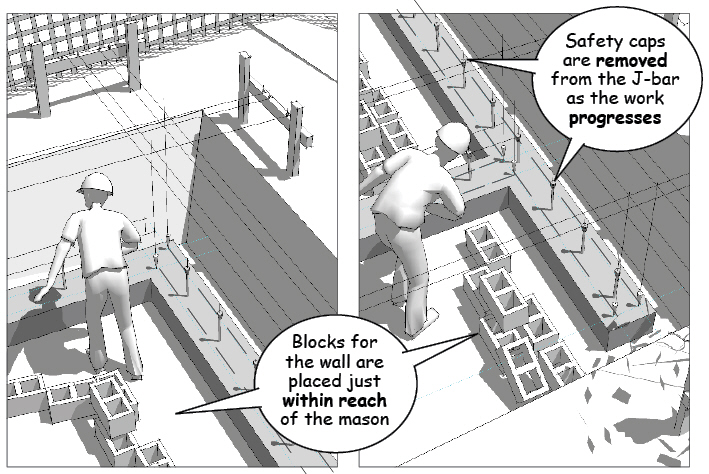
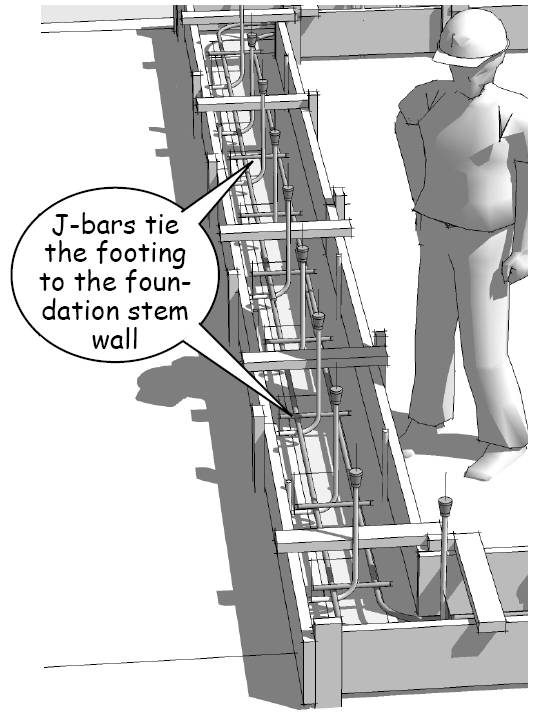
As you’ll see in a later phase, the stem walls require embedded vertical J-bars to tie reinforcing within the wall to the footing after the concrete is ready for the next step in the foundation’s construction.  
.
.(To be continued…) 

--------------------------- 
The material presented in this series has been taken from our book, “How a House is Built: With 3D Construction Models” The book includes annotated illustrations, captioned text, videos, models, and the 2D Preliminaries. 

 insitebuilders.com  
www.insitebuilders.com  
.

Tuesday, December 17, 2013

Part 10: Foundation; Footings

(Introduction, Syllabus, 1.Prelims, 1-4Precon, 2. Excavation, 3.Foundation, 4.Framing, 5.Roof, 6.Close, 7.MEP, 8.Finish)

The string lines are a quick reference and good enough for most projects, but experienced builders will use a transit level to cross check the layout of the foundation formwork based on vertical and horizontal distances and triangulated offsets from the workpoint.
Foundation Phase – Insitebuilders
In dense urban areas and zero lot line developments, a licensed surveyor is required to certify the location and depth of the foundation as a condition of the building permit. Zero lot lines occur when zoning restrictions allow construction right up to the property line.  

Concrete Formwork 
For some buildings, concrete is placed directly into a trench cut into the soil using the string lines as a reference. This method is commonly used for the perimeters and bearing walls of a slab or monolithic foundation.

For buildings supported by piers and continuous stem or basement foundation walls, spread footings are used to distribute the weight of the building to undisturbed soil.Foundation Phase – Insitebuilders
General contractors hire subcontractors who specialize in foundations to install these footings. As masons or concrete workers, they clamp together reuseable forms, place the rebar and concrete, then disassemble the forms for their next job as soon as the concrete begins to set.
Foundation Phase – Insitebuilders
In contrast, hands-on builders assemble the footing formwork using standard lumber, setting aside the material for reuse in other parts of the building as blocking or non structural framing once the forms are stripped and cleaned.

The depth and size of the footing depends on the weight and total load of the building. Dimensions will vary with soil bearing capacity, moisture content, and in some regions the soil frost line.

Bearing capacity and soil
Because the footing is designed to distribute the bearing load from a column or stem wall above, it is offset so that the footing itself is centered on that load. In other words, the center of the wall or column above sits over the center of the footing (see the wall section in the previous post).
Foundation Phase – Insitebuilders
Centering the load in this way means the width of the footing extends out from both sides of the wall above. This means the outer portion of the footing extends beyond the face of the finished wall.
Foundation Phase – Insitebuilders
Technically, the footing might cross a setback line, but since it is below ground, it is most often ignored by building officials. However, when the footing lies against a zero lot line with no setback, the spread footing must be engineered so that the entire foundation remains within the property boundaries.

(To be continued…)

---------------------------  
The material presented in this series has been taken from our book, “How a House is Built: With 3D Construction Models” The book includes annotated illustrations, captioned text, videos, models, and the 2D Preliminaries. 
How a House is Built - insitebuilders.com
.