Monday, December 15, 2014

Part 22: Shear Wall Framing

(Introduction, Syllabus, 1.Prelims, 1-4Precon, 2. Excavation, 3.Foundation, 4.Framing, 5.Roof, 6.Close, 7.MEP, 8.Finish)

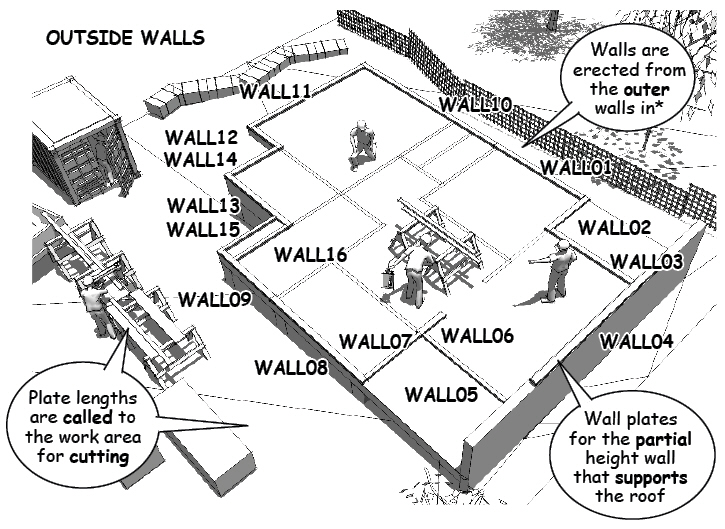
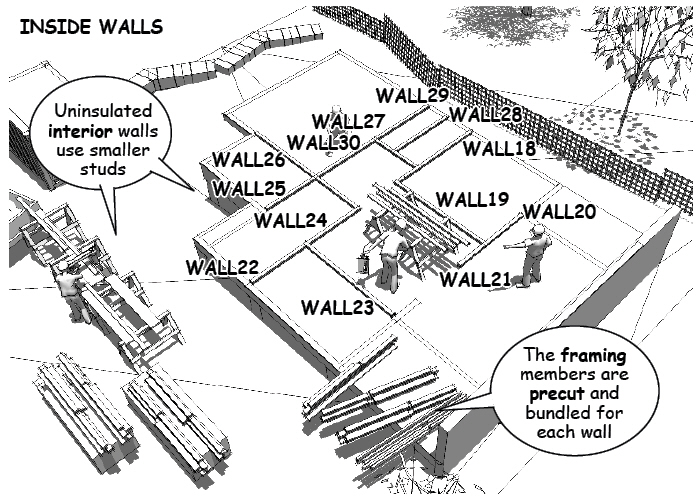
The wall layouts follow the floor plan for the building’s design, but the overall dimensions of the framing as well as the framing members themselves are determined in the field by the framing crew doing the work.  

Wall assembly
The construction method varies with the wall’s location, the size of the job, and the structural requirements. A full framing team is made up of a lead carpenter, framers, and at least one carpenter in charge of the actual cutting.
Framing Phase – Insitebuilders
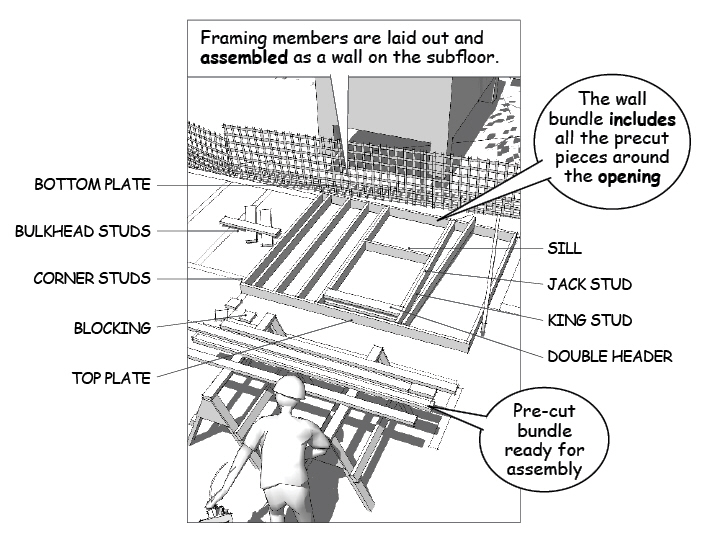
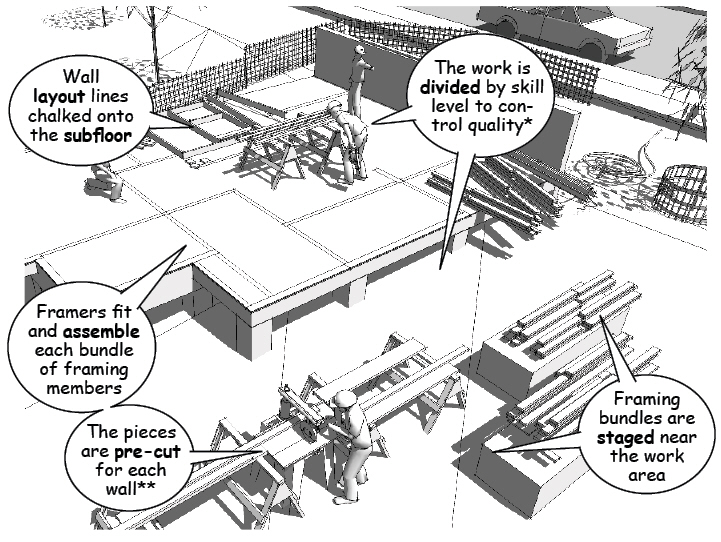
The lead carpenter sets the layout and sequence of wall construction and the framers determine the cut lengths for the assembly as they erect the walls. Lengths are either called immediately to a cutter as the wall is being assembled or listed on a cut-sheet so the pieces can be prefabricated as separate bundles. 

The pieces in each bundle are then marked for assembly and staged on the subflooring for different crews. Framing Phase – Insitebuilders
The idea is to safely separate the work, allowing skilled carpenters to check dimensions and fit the members together as each wall is put into position.

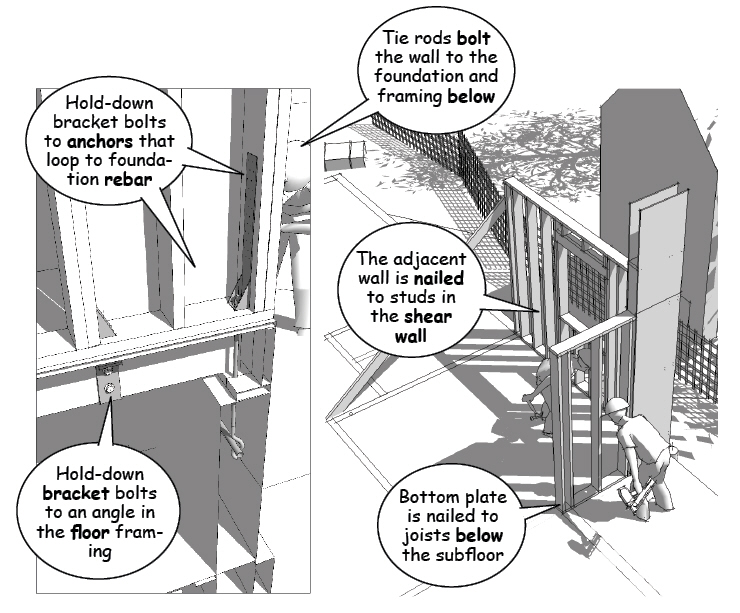
Shear walls anchored to the foundation 
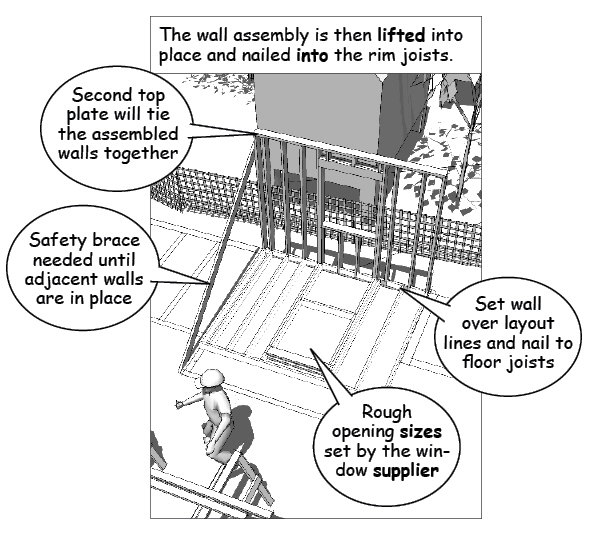
Once the wall is assembled, it is tilted up and moved into place over the layout lines marked on the subfloor. The bottom plate is then nailed or bolted through the subfloor into the top of the floor joists.
Framing Phase – Insitebuilders
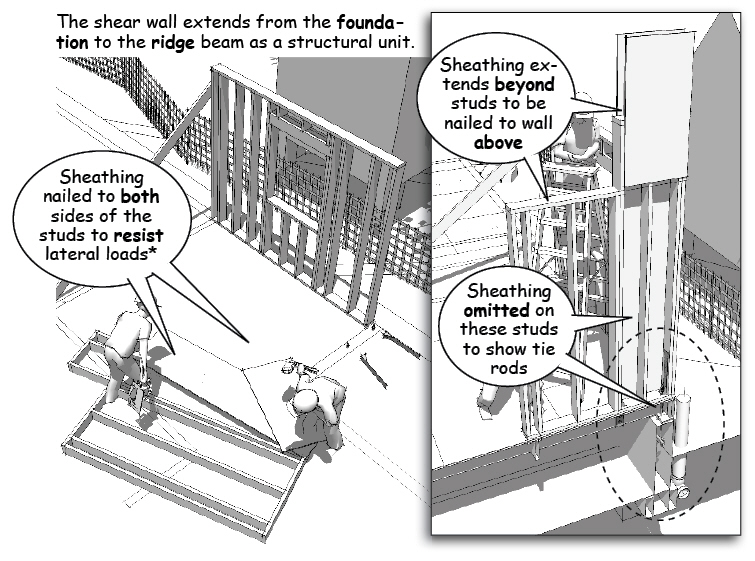
When regional wind or earthquake loads require special engineering, the shear walls are designed so that tie down anchors extend down to the floor framing to be bolted to the foundation.
Framing Phase – Insitebuilders
The shear walls also extend up from the foundation as part of the wall framing to be tied into the roof framing. In this way, the entire structure acts as a unified structural element. For this reason, the size and spacing of the nails securing the panels to the studs is critical to transferring lateral stiffness of the wall from the foundation to the roof.  


(To be continued…)  
---------------------------
The material presented in this series has been taken from our book, “How a House is Built: With 3D Construction Models.” The book includes annotated illustrations, captioned text, videos, models, and the 2D Preliminaries.


http://insitebuilders.com

Monday, November 17, 2014

Part 21: Preparation for Wall Framing

(Introduction, Syllabus, 1.Prelims, 1-4Precon, 2. Excavation, 3.Foundation, 4.Framing, 5.Roof, 6.Close, 7.MEP, 8.Finish)

The nail patterns in the subfloor should be inspected once the floor panels are in place. Staggering the panels eliminates continuous joints in the flooring and correct sizes, penetration, and spacing of the nails ensure that the structure acts as a continuous horizontal shear plane to counteract any possible lateral or twisting forces.  

Top and bottom plate layout
The walls are framed with studs equally spaced between top and bottom plates of the same width. The plates are cut to fit layout lines chalked directly on the subfloor for each wall.
Framing Phase – Insitebuilders
The plates match the length of the wall with spacing for studs, trimmers, and headers marked directly on the plates. All the pieces for the wall are precut and bundled as a package to speed final assembly. The framing for the outer walls are installed first. The studs in the outer walls are thicker to add strength and allow for insulation.
Framing Phase – Insitebuilders
The sequence of installation for the interior walls is determined by the carpentry foreman according to the location of corners and wall intersections. Studs are added at these corners and intersections as backing for wall board to be applied once the framing is complete.  

Wall framing bundles ready for assembly
The framing team is composed of a cut man (or woman) at the work station in charge of bundling the pieces for each wall. A lead carpenter calls out the lengths, sizes, and pieces required for each wall and the carpenters then assemble the walls as the prefabricated bundles are completed.
Framing Phase – Insitebuilders
Each bundle includes the top and bottom plate, studs, headers, and trimmers necessary for that wall. The idea is to safely separate the work for the wall framing, allowing skilled carpenters to check dimensions and the fit of the walls before they are assembled.
Framing Phase – Insitebuilders
The members in the bundle are laid out on the subfloor with the bottom plate positioned on the wall’s layout line. Sizes are checked and the pieces are nailed together while they are flat on the subfloor.

Once assembled, the wall is tilted to stand vertically, moved into place and temporarily braced until the adjoining wall is installed. The bottom plate is then positioned exactly on the layout lines and nailed to the floor joists. Solid blocking is added whenever a plate does not bear directly on a joist.  

 (To be continued…)  

--------------------------- 
The material presented in this series has been taken from our book, “How a House is Built: With 3D Construction Models” The book includes annotated illustrations, captioned text, videos, models, and the 2D Preliminaries.
 http://insitebuilders.com

Monday, October 13, 2014

Part 20: Finalizing the Floor Framing

(Introduction, Syllabus, 1.Prelims, 1-4Precon, 2. Excavation, 3.Foundation, 4.Framing, 5.Roof, 6.Close, 7.MEP, 8.Finish)

For jobsite safety, professional framers will install the plywood subfloor as soon as the joists have been secured. In high wind or earthquake zones, the joists and floor frame are strapped to the foundation at the ends of the girders and along the perimeter.  

Staggered subfloor 
The subfloor is laid in a staggered pattern so that its lengths are perpendicular to the direction of the joists. The plywood is then glued and nailed to the joists so the seams are centered on the length of the bearing surface.
Framing Phase – Insitebuilders
In some cases, interlocking panels and/or edge nailing to solid blocking are used to add strength to the floor framing. Solid blocking under bearing loads from above are also important.

In this example an opening is framed in the floor joists to provide access to the crawlspace. Interior access is important when you want to avoid frost lines or swales in the finish grade around the building.
Framing Phase – Insitebuilders
The enclosed crawl space is also prepared for future construction before the floor is sealed. This includes raking out rocks and debris and spreading sand or heavy mats to make it easier to service certain areas. Materials and equipment that would be difficult or impossible to put in the crawlspace are also staged for later installations.  

Framing an open crawl space
The open crawlspace is framed over girders and foundation piers. The frame is again strapped to the foundation to structurally tie the frame to the foundation. Open crawl spaces allow drainage, shade, and natural circulation in warm, humid, or wet environments, but require insulation and soffits in cold climates.
Framing Phase – Insitebuilders
Access under the raised floor makes it easier to maintain or change mechanical and electrical systems, but it’s important to use pressure treated materials in extremely moist areas or if the joists are less than 18 inches from the finish grade.
Framing Phase – Insitebuilders
The crawl space is again prepared for future construction. This includes installing plumbing and mechanical systems under the floor and grading the backfill to slope away from the foundation piers and stem walls.  

Finishing the open crawl space
Mechanical and electrical lines are drilled and fitted in the floor cavities before the subfloor is finalized. Here again phased construction models and careful planning help coordinate future installations, reduce costs, and speed the final construction.
Framing Phase – Insitebuilders
Once the joists are installed, insulation and soffits are fitted to the underside of the open framing. This reduces heating or cooling losses through the floor and seals the joists and insulation from moisture, insects, and other pests. Perimeter skirting prevents wild life from using the space for nests or burrows.
Framing Phase – Insitebuilders
Note that nail size and nail spacing vary with the loads imposed on the floor and the structural design of the building framework. Requirements will vary according to local codes and the loads imposed on the finished frame.  

 (To be continued…)  

---------------------------  
The material presented in this series has been taken from our book, “How a House is Built: With 3D Construction Models” The book includes annotated illustrations, captioned text, videos, models, and the 2D Preliminaries. 

Insitebuilders.com .
.

Wednesday, September 17, 2014

Part 19: Framing; Sill Plates and Floor Joists

(Introduction, Syllabus, 1.Prelims, 1-4Precon, 2. Excavation, 3.Foundation, 4.Framing, 5.Roof, 6.Close, 7.MEP, 8.Finish)

To begin framing the floor the top of the foundation stem walls and piers are first cleared of debris and any pockets in the reinforcing filled with grout to seal the surface. This includes wire brushing the anchor bolts to remove concrete or rust and make it easier to secure nuts and washers as the plates are drilled and fitted, flush to the outside face of the foundation wall.  

Setting the sill plates
These sill plates serve three purposes. The first is to provide a uniform working surface along the top of a level stem wall, shims should not be necessary depending on the skill of the masons. Framing Phase – Insitebuilders
The second reason for the sill plates is to protect the framing from deterioration due to moisture and insect infestations. Redwood and other insect resistant woods were once used, but the availability of these materials has been seriously depleted, making their use impractical for most modern constructions.

Instead, a non-arsenic chemical solution is drawn into wood fibers under pressure to protect it from moisture and oxidization. Micronized copper is added to this chemical to act as a termite barrier, reducing the possibility of rot and insect damage, see www.ufpi.com.
Framing Phase – Insitebuilders
Most importantly, the sill plates act as a bearing surface for the framing members that rest directly on the stem wall. The wood sill then absorbs the weight of the building and ties the framing to the foundation. Simpson Strongtie has a complete line of structural anchors with uplift load limits, see www.strongtie.com.  

The sill plates are structural members
With the sill plates securely anchored and the drains and moisture protection installed, backfill is placed to provide a safe working surface around the foundation. It’s important that the backfill not add soil pressure high up on the wall until the floor framing is finalized. Once in place, the floor adds lateral strength to the top of the wall.
Framing Phase – Insitebuilders
Safety is again the number one concern on a professional jobsite. For this reason the framing team begins their work by setting up a designated cutting zone and a lay down area to stage cut materials. The work zone must be close enough to the carpenters so that they can call out dimensions and variations as they measure and place the joists and girders.
Framing Phase – Insitebuilders
Composite beams are glued and spiked together from standard milled materials according to engineering calculations. Field fabricating girders and beams in this way reduces the need for handling and transporting larger framing members.
Framing Phase – Insitebuilders
The joists are fitted into hangers to be flush with the top of the composite girders. Flush framing adds height to a basement or crawl space making it easier for mechanical and electrical contractors to access the underside of the floor.

Note that straps, clips, and anchors work together to tie the frame to the foundation and counter uplift loads. Earthquake and hurricane regions require structural connections engineered according to the environmental loads imposed on the building.    

(To be continued…)  

---------------------------  

The material presented in this series has been taken from our book, “How a House is Built: With 3D Construction Models” The book includes annotated illustrations, captioned text, videos, models, and the 2D Preliminaries. 
 Insitebuilders.com

Thursday, August 14, 2014

Part 18: Framing; Moisture Protection

(Introduction, Syllabus, 1.Prelims, 1-4Precon, 2. Excavation, 3.Foundation, 4.Framing, 5.Roof, 6.Close, 7.MEP, 8.Finish)

The carpentry team begins the next phase of the construction after reviewing and accepting the completed foundation checklist. Once they start, responsibility shifts to their shoulders and any problems discovered once framing has started will only be complicated by delays and change orders.

Foundation drains and waterproofing
The framing begins by sealing the foundation stem walls, adding moisture and vapor barriers, setting perforated foundation drains, and placing filters over washed gravel to control ground water and wet soil conditions. Moisture protection has to be completed so that the foundation can be backfilled immediately after the floor joists are in place.
Framing Phase – Insitebuilders
To minimize petroleum based coatings, dimpled membranes are used to cover the foundation walls with a high recycle content HDPE material (See Superseal Construction Products). The membranes zip together to form a barrier against moisture that would otherwise penetrate the stem wall.
Framing Phase – Insitebuilders
The perforated drains are located near the bottom of the foundation footings to channel accumulated moisture to drywells, drain fields, or storm water systems. If flexible drain pipes are used, they’re laid over a compacted base to keep them from settling and clogging once the backfill is in place.
Framing Phase – Insitebuilders
Washed gravel is shoveled over the perforated drains and covered with fabric filters just before backfilling following national standards for moisture control.  

Mobilizing the framers
Mechanical and plumbing supply and drain lines, electrical cables, and grounding rods are installed through the foundation walls and into the crawl space before the framing restricts access to the area under the floor. These lines penetrate the stem walls through special pressure sleeves and are bedded in trenches according to utility specifications.
Framing Phase – Insitebuilders
While the foundation is open, the crawl space should also be bedded with sand for later servicing by plumbing and electrical contractors or if there’s a basement the floor is prepared for a concrete slab.

Framing Phase – Insitebuilders
Carpenters begin by cleaning the anchor bolts and top of the stem walls in preparation for the sill plates. For safety, the site is cleared of all scraps, tools, and unnecessary materials before staging the work areas and equipment to support the framing team.
Framing Phase – Insitebuilders
 For complex projects, knowledgeable contractors will use the site utilization plans (SUP) made during the preconstruction phase along with a simple deconstructible construction model to anticipate daily tasks and save time and materials.

The idea is to minimize material moves, repositioning, and cross traffic by thinking through the floor, wall, and roof framing prior to starting the work.  

(To be continued…)  

---------------------------

The material presented in this series has been taken from our book, “How a House is Built: With 3D Construction Models” The book includes annotated illustrations, captioned text, videos, models, and the 2D Preliminaries.
 http://Insitebuilders.com

Monday, July 14, 2014

Part 17: Foundation; Checklist Before Framing

(Introduction, Syllabus, 1.Prelims, 1-4Precon, 2. Excavation, 3.Foundation, 4.Framing, 5.Roof, 6.Close, 7.MEP, 8.Finish)  

Foundation Review (Foundation Checklist (PDF)
The formwork for the concrete footings is laid out on the floor of the excavation using the same workpoint and batter boards that were used to guide the excavation. The forms hold the poured concrete and steel reinforcing. Almost all steel reinforcing wire and rebar are now made from recycled material.Foundation Phase – Insitebuilders
As soon as possible after the concrete has cured, the forms are removed, cleaned and reused in the framing for the house. This minimizes waste, reduces the cost of rigid formwork, and lowers consumption for a more sustainable approach to construction.
Foundation Phase – Insitebuilders
Building and stripping the forms and preparing them for reuse is a time consuming process that can be all but eliminated with the use of fabric forms. Fabric forms hang from horizontal screed boards and use the natural shape of wet concrete to shape the concrete.
Foundation Phase – Insitebuilders
The foundation stem walls for this house are constructed with standard concrete masonry units called “blocks.” The blocks are laid in a “running bond” using masonry tools and reinforced with horizontal and vertical steel. The steel is embedded in “grout” to form a solid structural system. Depending on site and soil conditions, the same walls could also be built using cast-in-place concrete or insulated forms. Foundation Phase – Insitebuilders
Both masonry and concrete walls raise the frame of the house off the ground. This elevates the foundation and provides a crawl space or basement under the house to maintain and service the building during its life cycle.
Foundation Phase – Insitebuilders
A raised foundation reduces potential moisture penetration, mold and mildew, insects and insecticides, and makes it easier to add or modify the house as needs and requirements change over time.

Simplified Construction Modeling Tutorial
For anyone interested in the construction modeling techniques used for the Foundation Phase illustrations, see this quick tutorial. 
 
The tutorial is one of more than 70 videos included in our book “Mastering the Art of 3D Construction Modeling.”  

(To be continued…)  

---------------------------  
The material presented in this series has been taken from our book, “How a House is Built: With 3D Construction Models” The book includes annotated illustrations, captioned text, videos, models, and the 2D Preliminaries.
 Insitebuilders.com

Monday, June 16, 2014

Part 16: Foundation; Finishing the Foundation for the Framing


(Introduction, Syllabus, 1.Prelims, 1-4Precon, 2. Excavation, 3.Foundation, 4.Framing, 5.Roof, 6.Close, 7.MEP, 8.Finish)

In the end, the efficiency of the foundation’s construction depends on the coordinated effort of a team of skilled masons. Masters and journeymen work at different rates, each with subtle variations in their techniques and demands for support.
Foundation Phase – Insitebuilders

Anticipating need
Apprentices and hod carriers support the masons by making sure everything is in place and ready for use as it is needed. Materials that arrive too soon or too late are likely to impede the pace of the work. The “mud” or mortar is especially important because temperature and time are variables that must be accounted for in mixing and placing this critical material within reach of the masons before it begins to cure. Any delay in its delivery could weaken the joints in the block wall.
Foundation Phase – Insitebuilders
The support team is also responsible for moving debris and excess materials out of the way in order to keep the site safe for everyone in the area. This means they must continuously monitor the work, anticipating the rate of construction, including bending and cutting reinforcing so that it can be installed when and where it is required.

The size and spacing of the reinforcing is specified in the construction documents and varies with the height of the wall and soil conditions. Engineers calculate its placement so that it adds tensile strength to the foundation and counters the lateral forces of wind or soil pressure.

When the wall is complete, grout is pumped into the cells of the hollow masonry units and the wall is toweled flat. Before the grout cures, anchor bolts are embedded at specified distances from the corners and at intervals along the top of the wall in preparation for the floor framing.
Foundation Phase – Insitebuilders
The pressure treated sill plates are drilled and bolted to the foundation by the framing contractors responsible for the next phase of the construction. As we’ll see in the next post, the carpenters strap the rim and floor joists to these sill plates in order to firmly tie the building’s frame to the foundation.

Keep in mind that the height of the walls above the concrete footings is determined by the same workpoint used to guide the excavation. That means the foundation’s wall height establishes the elevation of the floor framing.  

(To be continued…)

---------------------------  

The material presented in this series has been taken from our book, “How a House is Built: With 3D Construction Models” The book includes annotated illustrations, captioned text, videos, models, and the 2D Preliminaries.
 Insitebuilders.com .
. 

HOMEBUILT HOUSE


HOMEBUILT HOUSE: A Vernacular of Uncertainty
Often thought of as squatters, our new book details the work of informal builders piecing together houses on land that others feel they have no right to occupy.
HOMEBUILT HOUSE: A Vernacular of Uncertainty
These houses are built in places where style and design have no meaning. Instead, construction begins with the hands-on challenge of piecing together a physical form using only immediately available materials as form givers.
HOMEBUILT HOUSE: A Vernacular of Uncertainty
This is an architecture sculpted without pretense or plan, governed by indeterminate events, endured in a marginal existence, and resolved according to basic human instincts for shelter and survival.
HOMEBUILT HOUSE: A Vernacular of Uncertainty
For these builders, construction is the focus of a casual process that gives life purpose in its making, sustaining not only an unregulated spirit and resilience, but a sense of pride in a visible expression of autonomy and self-determination.

In the end, there are only a few who share the instincts of an informal builder and have the courage to take on the challenge of building a home of their own.

See also.… . .
.

Tuesday, May 13, 2014

Part 15: Foundation; Laying Block

(Introduction, Syllabus, 1.Prelims, 1-4Precon, 2. Excavation, 3.Foundation, 4.Framing, 5.Roof, 6.Close, 7.MEP, 8.Finish)

Once the masonry materials and equipment are in place, the project is considered staged and ready for the next phase of the construction. Most superintendents will check the project just before their arrival to make sure everything is ready to go, no one wants to upset the masons before they even get started.  

Teamwork
Depending on the size of the project, the masons will work in teams that include at least a journeyman and a person called a hod carrier or hoddie. Though often mistaken for a simple laborer, a good hod carrier is important to the flow of the work because block, brick, grout, and reinforcing have to be placed within reach of a journeyman or apprentice just as these materials are needed.
Foundation Phase – Insitebuilders
Depending on union rules, a master mason might only be important for complex details or to manage additional teams on larger projects. Residential foundations like this one would usually only need to be checked for progress or to coordinate the location of anchors, conduit, or plumbing sleeves that penetrate the stem wall.

Laying Block
A plumb bob is hung from the string line intersection to mark the corners and junctures of the stem walls. The dimensions of the wall should fit a standard 8” module so they can be put together without unnecessary cutting or trimming the concrete block.
Foundation Phase – Insitebuilders
If the lengths of the walls don’t match the size of the standard masonry units, block will have to be cut to fit into the wall’s construction. This adds to the cost of the foundation and creates a break in the joint pattern of the block that is often awkward to handle with a striking tool.
Foundation Phase – Insitebuilders
The masons start in the corners, bedding the blocks to bond with the concrete footing and leveling the first course with a laser or a line level while making sure the corners are square.Foundation Phase – Insitebuilders
As they place the block, the J-bar coming out of the footing is fitted to the hollow core of the block, sometimes bending the rebar slightly to center the reinforcing. Additional lengths of vertical rebar are tied to the J-bar as the wall rises. The hollow cavities will then be filled with grout to stiffen the wall and bind it to the footing.
Foundation Phase – Insitebuilders
The top of the block or a hand level is struck with the trowel to seat the block into the mortar joint and any horizontal reinforcing that might be required. Joints are troweled flush or struck with a concave tool depending on project specifications.
Parging might also be applied in extremely wet conditions to provide a smoother surface for waterproof sealers. Platforms and scaffold make the work easier by bringing each course to a comfortable height. Guardrails are required for fall protection if the wall rises above limits set by construction safety codes.

(To be continued…)  

---------------------------

The material presented in this series has been taken from our book, “How a House is Built: With 3D Construction Models” The book includes annotated illustrations, captioned text, videos, models, and the 2D Preliminaries.

 Insitebuilders.com .

Monday, April 14, 2014

Part 14: Foundation; Stem Walls for a Raised Foundation

(Introduction, Syllabus, 1.Prelims, 1-4Precon, 2. Excavation, 3.Foundation, 4.Framing, 5.Roof, 6.Close, 7.MEP, 8.Finish)

With the site cleared for the next step in the foundation’s construction, a stem wall is needed to support the floor framing. Stem walls make it possible to raise the floor level for storm cellars, basements, or mechanical crawl space.

A raised foundation also changes the profile of a building, reducing potential moisture penetration, mold and mildew, insects and insecticide contamination, and makes it easier to add or modify the house as mechanical requirements change over time. See the website for the Southern Forest Products Association.
Foundation Phase – Insitebuilders
The stem walls and piers could be built using cast-in-place concrete with rigid or insulated forms. Cast concrete walls have the advantage of being a strong monolithic structure in wet or difficult soil and are required by code for earthquake engineering, heavy loads, and some soil, ground water, or site conditions  

Checking the footing
The foundation walls for this building are constructed with standard concrete masonry units (CMU). The concrete blocks are laid using common tools and reinforced with horizontal and vertical steel that is embedded in grout to form an integrated structural system.

Before beginning the wall’s construction, the site is cleared for safety, string lines are replaced on the batter board, and the foundation is checked for compliance with the construction documents prior to finalizing preparations for the work. Verification of existing conditions is especially important when the masonry contractor is not the builder who installed the concrete footing.
Foundation Phase – Insitebuilders
The workpoint is used to check the elevation of the footings and mark the corners of the foundation walls, verifying the string line intersections (see Part 10 Foundation Footings).
Foundation Phase – Insitebuilders
The foundation stem walls extend from the top of the concrete footing up to the bottom of the sill plates that support the structural framing. That means the elevation of the footings is directly related to the reference height of the stem walls and the corresponding elevation for the floor, wall, and roof framing.

Staging the Masonry
To prevent future conflict, some builders require each subcontractor to sign off on an existing installation prior to allowing them to move material and equipment onto the jobsite and start their work. This makes subsequent specialists solely responsible for each step in every phase of the construction.
Foundation Phase – Insitebuilders
Staging for the masons includes lifting pallets of masonry into the excavation and setting up a mixer along with grout/mortar and sand as required. Access to water is of course critical and power may be necessary for cutting tools and rebar bending equipment. Erosion control and safety concerns for the workers are also important.
Foundation Phase – Insitebuilders
As you’ll see in the next post, the walls for this building are designed using standard block sizes and masonry dimensions to minimize cutting and fitting. This means all horizontal and vertical dimensions are specified in eight inch (8”) increments.  

(To be continued…)

---------------------------

The material presented in this series has been taken from our book, “How a House is Built: With 3D Construction Models” The book includes annotated illustrations, captioned text, videos, models, and the 2D Preliminaries.
http://insitebuilders.com .