Tuesday, December 20, 2016

Part 45: The Plumbing Works as a System

(Introduction, Syllabus, 1.Prelims, 1-4Precon, 2. Excavation, 3.Foundation, 4.Framing, 5.Close-In, 6.Roofing, 7.MEP, 8.Finish)


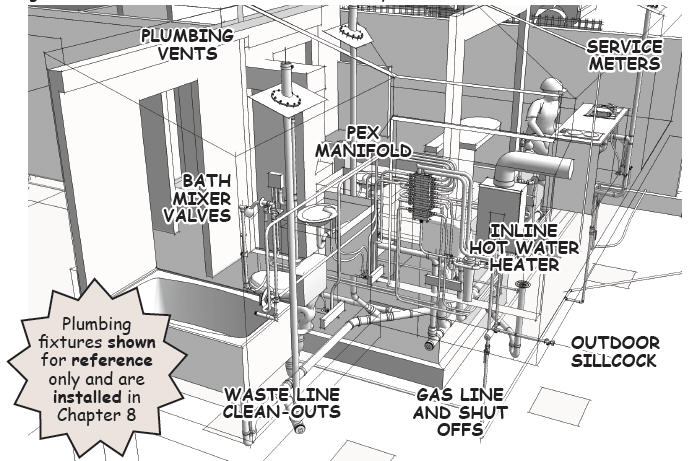
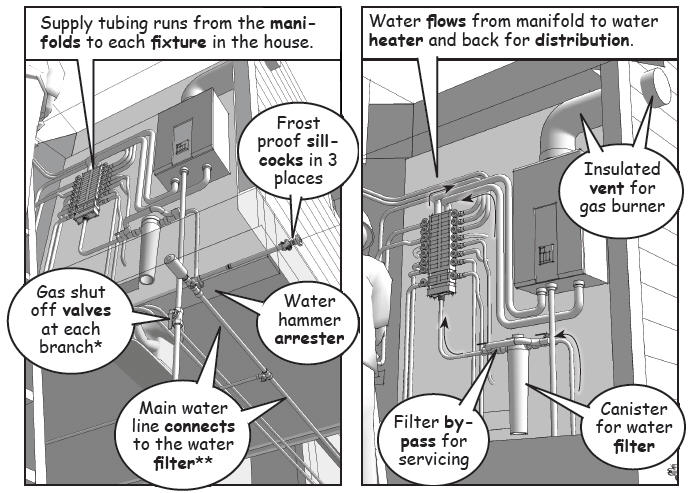
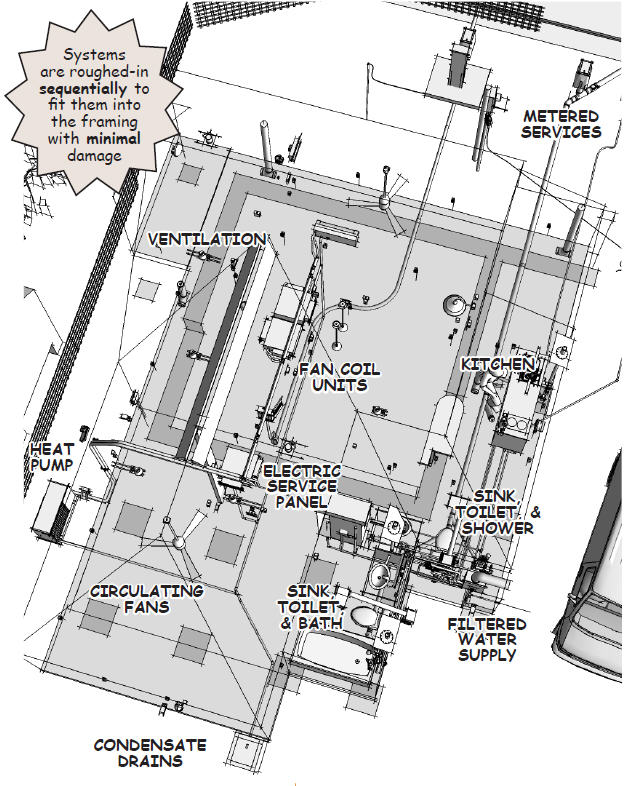
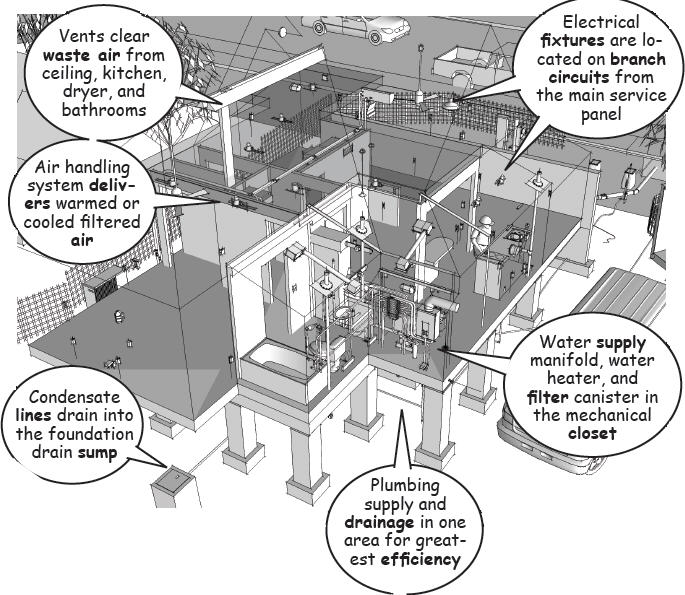
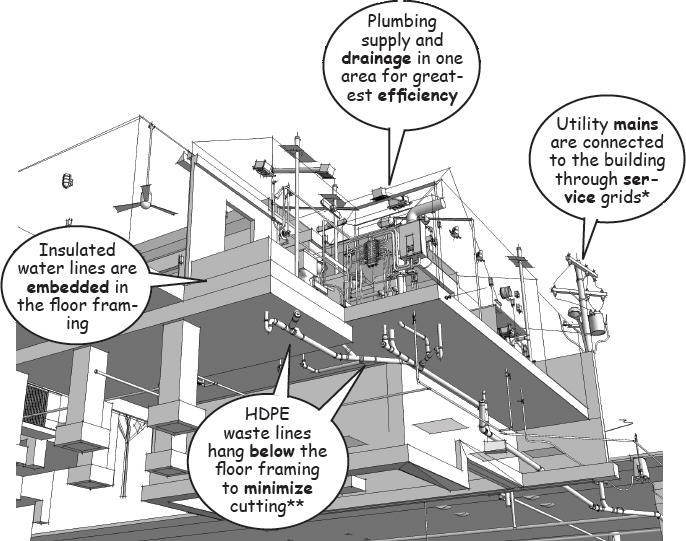
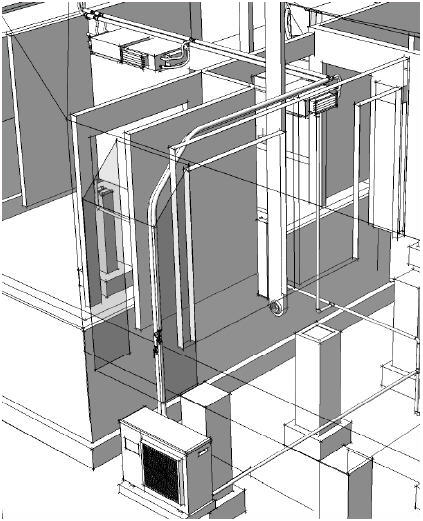
The plumbing works as a system. Hot and cold water supplies are delivered through pressurized lines to the plumbing fixtures and unpressurized drains remove the waste to a sewerage disposal system.
MEP Phase – Insitebuilders

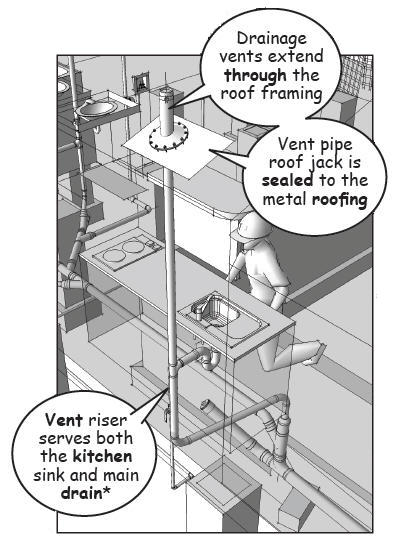
These drains rely on gravity and the correct slope to sustain the flow of liquid and solid waste. Vents relieve negative pressure created by the flow. 

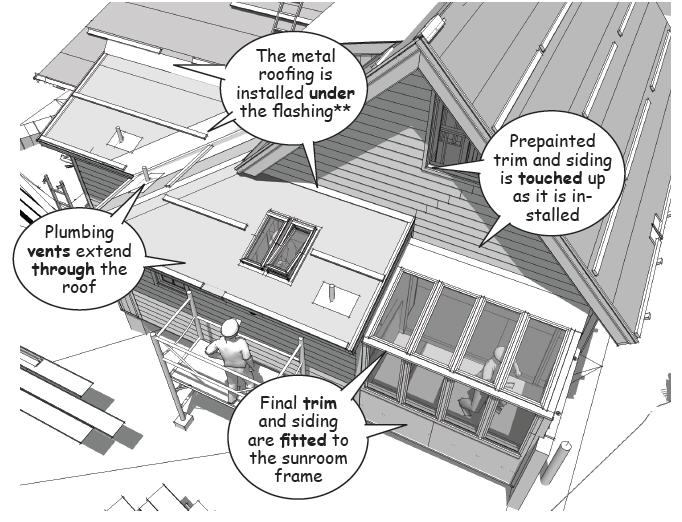
Waste disposal includes drains and vent

The size and location of the drains and vents are determined by anticipated loads, site conditions, and the local building code.
MEP Phase – Insitebuilders

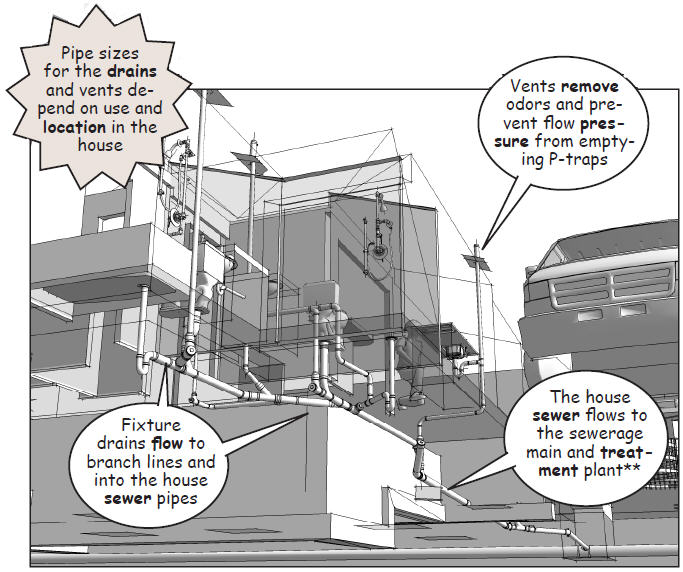
Plumbing fixtures are connected to branch and main lines and carry the waste to a sewer connection. Onsite septic systems are used where offsite sewerage treatment is not available. 
MEP Phase – Insitebuilders

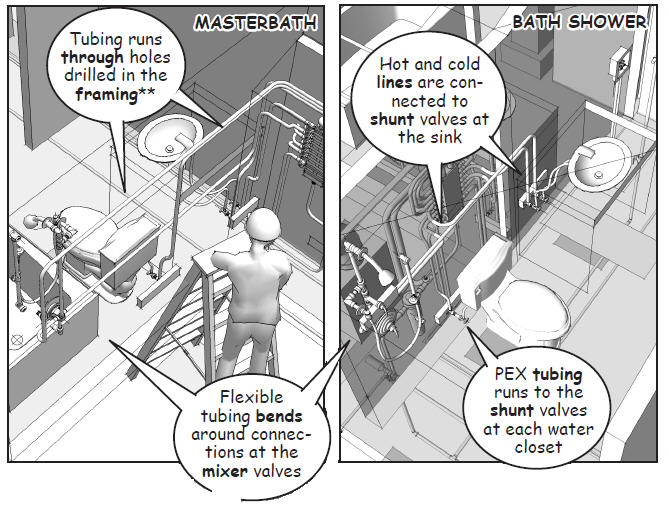
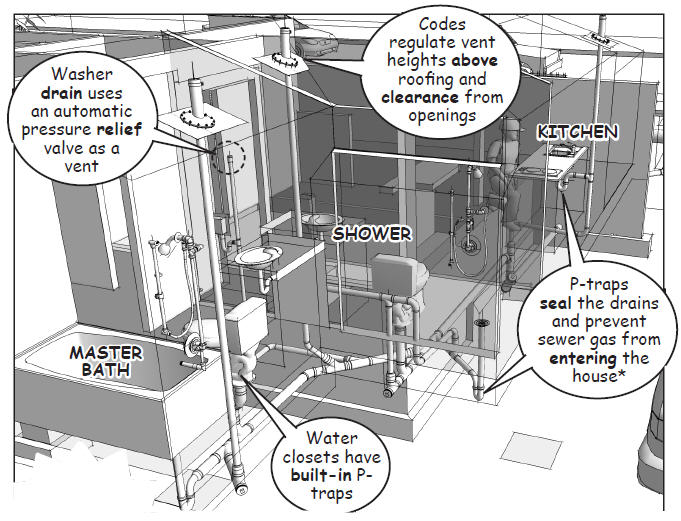
The tank above the toilet bowl flushes waste into the drains. A p-trap is built into the porcelain base of the toilet. P-traps are used to block sewer gas from entering the house (See P-traps).
MEP Phase – Insitebuilders

The drains from the sinks are sized according to anticipated use. In most cases, the dishwasher and garbage disposal connect to the drain from the kitchen sink. Undercounter relief valves are used as vents for island sinks.

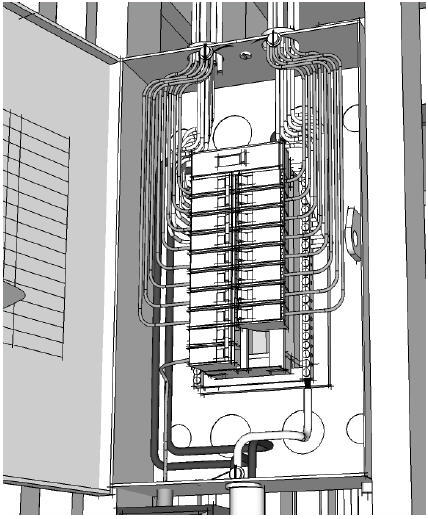
The connection to the grid


Special permits and meters are required to “hook-up” to water and gas mains. The meters are installed by the plumber and certified by the service provider. The utility companies control their services with lockable street-side shut off valves.
Emergency shut off valves are installed on the customer side of a gas meter in most earthquake regions.
MEP Phase – Insitebuilders
Though permits are required, sewer connections are not normally metered. Instead, a central waste line flows from the building to the treatment system (see Preconstruction). Note that backflow valves are required to block reverse flow from flooded sewers.    


(To be continued…)

--------------------------- 
The material presented in this series has been taken from our book, “How a House is Built: With 3D Construction Models” The book includes annotated illustrations, captioned text, videos, models, and the 2D Preliminaries. 
 Insitebuilders.com

Tuesday, November 15, 2016

Part 44: MEP Installation starts with the Plumbing

(Introduction, Syllabus, 1.Prelims, 1-4Precon, 2. Excavation, 3.Foundation, 4.Framing, 5.Close-In, 6.Roofing, 7.MEP, 8.Finish)

The supply lines that enter the house are installed to serve the mechanical, electrical, and plumbing (MEP) fixtures shown on the construction drawings.
MEP Phase – Insitebuilders
This includes power and communications cables, gas line, special fluids, and a main water line with hot and cold branch lines to the sinks, water closets, baths, and outside faucets. The work begins with the plumbing rough-in.

PEX supply lines  
Soldered copper tubing has been largely replaced by polyvinyl chloride (PVC) and chlorinated polyvinyl chloride (CPVC) tubes and fittings. Both of these synthetic plastic polymers are said to have latent environmental problems (see this article at Healthy Building Science).

Based on toxicity studies for water supply lines, flexible cross-linked polyethylene (PEX) tubing has shown to be a sustainable alternative to PVC installations. PEX tubing has gained in popularity because its simple installation makes it far less expensive, easier to maintain, and not as prone to environmental contamination.
MEP Phase – Insitebuilders
The PEX system shown in this example includes hot and cold water supplies in combination with recyclable high density polyethylene (HDPE) waste and vent pipes.

In cold climates, the main water supply runs below the local frost line, up into the building through a slab or insulated floor frame, into an insulated mechanical closet that houses a PEX distribution manifold.
MEP Phase – Insitebuilders
One branch of the water line flows from the manifold to a water heater and then back to the hot side of the manifold. Branch tubing then runs from the hot and cold sides of the manifold to shunt valves for each plumbing fixture.

The PEX tubing is color coded red and blue for hot and cold and is strung through the framing like wiring as a single continuous line. There are no inline joints or spliced connections to fail (see www.pexsupply.com).
MEP Phase – Insitebuilders

Be careful with gas lines With an abundance of caution, black iron gas lines are installed from the gas meter to the in-line hot water heater, dryer, and kitchen fixtures in lieu of the less expensive corrugated stainless steel tubing (CSST) normally found in most residential construction.

Building codes govern gas pipe material, size, and wall thickness for all underground service. Note that local codes also dictate the size and location of holes cut into the framing as well as the use of protective plates to prevent accidental punctures.    

(To be continued…)  


---------------------------   
The material presented in this series has been taken from our book, “How a House is Built: With 3D Construction Models” The book includes annotated illustrations, captioned text, videos, models, and the 2D Preliminaries. 

 Insitebuilders  

Tuesday, October 18, 2016

A Quick Look at a Piece-based Construction Model

(Introduction, Syllabus, 1.Prelims, 1-4Precon, 2. Excavation, 3.Foundation, 4.Framing, 5.Close-In, 6.Roofing, 7.MEP, 8.Finish)

Before I begin the posts for the building systems, I’ve been asked to describe how the models for these illustrations were made and what programs I use for construction modeling.

Insitebuilders Tutorial
 All of the models in our books were built using an older, simpler, and “free” version of SketchUp v5 or v6 (download here)  

Overview of Construction Modeling 
A construction model is a builder’s tool and has nothing to do with 2D drafting, estimates, or quantity takeoffs. Instead, the models are “piece-based” and constructed just as they would be in the field. They are virtual simulations. Here are the three basic steps (and their tools)
  1. Move around the model space to orient yourself (Orbit, Pan, and Zoom
  2. Make the pieces for the assembly (Rectangle, Extrude, and Scale)
  3. Snap the pieces together in the sequence of construction (Move. Rotate, and Copy)
A Tutorial: Build a concrete block wall 
If you’re new to SketchUp open a new file and play with the program menus, dialog boxes, and navigation tools to see what they do.  

When ready:

Manufacture a block (with these tools):
  1. Drag out an 8,16 rectangle (Rectangle tool)
Insitebuilders Tutorial
  1. Extrude up 8 to form the block (Extrude tool)
Insitebuilders Tutorial
  1. Select and Group as a solid (Group tool)
  2. Name the block (Entity Information)
Insitebuilders Tutorial

Repeat the above steps to make a half block (8,8)

Assemble the wall (with these tools)
  1. Drag out intersecting Chalklines (Tape Measure tool)
  2. Select a corner and snap into place (Move tool)
  3. Select an axis and rotate (Rotate tool)
Insitebuilders Tutorial  

Adding detail 
It gets a little more complicated if you want to add more detail. For example, to edit the block and add hollow cells to illustrate rebar placement.: 
  1. Select the block and right click to Edit Group (or double click)
  2. Use Tape Measure tool with Ctrl to drag out chalk lines
  3. Drag out a Rectangle for the cut out
  4. Extrude the cut out down to form the hollow cell
Insitebuilders Tutorial

Here’s the model if you want to deconstruct it (InsitebuildersTut01.skp)  

Tips and Tricks
  1. Store new pieces to a warehouse file for use in future models
  2. Use the older and much simpler SketchUp v5 or v6 (download here)
  3. Stay organized with named Groups in the Outliner
  4. Use Construction Lines like you would use chalk-lines in the field.
  5. Setup Shortcut keys and Preferences as you build your model
  6. See our videos on the Insitebuilders YouTube Channel
Insitebuilders Tutorial
  1. If you get really serious, take a look at Mastering the Art of Construction Modeling.


(To be continued…)

---------------------------
The material presented in this series has been taken from our book, “How a House is Built: With 3D Construction Models” The book includes annotated illustrations, captioned text, videos, models, and the 2D Preliminaries.
Insitebuilders.com 
 

Tuesday, September 20, 2016

Part 43: Rough-in Sequence

(Introduction, Syllabus, 1.Prelims, 1-4Precon, 2. Excavation, 3.Foundation, 4.Framing, 5.Close-In, 6.Roofing, 7.MEP, 8.Finish)

Mechanical systems bring the house to life. These include metered services provided by public utilities as well as onsite systems like air handling, waste water treatment, and drainage control.
MEP Phase – Insitebuilders
There are also alternative sources of power, water, and waste disposal that can be privately metered to track consumption. Off grid services include septic systems, well water, on-site drainage, grey water collection, alternative power sources, and LP or methane gas.

Indoor Air Quality
Indoor air quality is an important consideration during the installation of the mechanical systems because the building is sealed and will trap airborne volatile organic compounds (VOC) and other contaminants during the rough-in and finish work.
MEP Phase – Insitebuilders 
The systems are installed sequentially to minimize contamination, damage, and rework. This includes the cutting and drilling associated with the concealed plumbing, HVAC equipment, line-sets, and ductwork, and finally the electrical wires, boxes, connections, and fixtures.

Building Systems Work Together
After the cabinets are installed and walls painted, the systems subcontractors return to install their plumbing fixtures, finalize the electrical lighting and connections, and clean and balance the HVAC system.
MEP Phase – Insitebuilders
Important is that the finished systems work together, with ventilation and drainage to remove waste, filtering equipment to condition the intake of air and water, and electrical fixtures balanced on engineered circuits to maximize efficiency.
MEP Phase – Insitebuilders
Note that some builders avoid PVC conduit and piping because of the environmental impacts of their manufacture and disposal, but equal consideration should be given to minimize galvanized, lead, copper, and adhesive materials that raise their own environmental concerns.  


 (To be continued…) 
 --------------------------- 
The material presented in this series has been taken from our book, “How a House is Built: With 3D Construction Models” The book includes annotated illustrations, captioned text, videos, models, and the 2D Preliminaries. 
 Insitebuilders.com

Tuesday, August 23, 2016

Part 42: Mechanical, Plumbing, and Electrical (MEP)

(Introduction, Syllabus, 1.Prelims, 1-4Precon, 2. Excavation, 3.Foundation, 4.Framing, 5.Close-In, 6.Roofing, 7.MEP, 8.Finish)

The objective of the Close-In Phase is to seal the house against the weather so that the mechanical, electrical, and plumbing (MEP) can be installed.
MEP Phase – Insitebuilders  

A sustainable shell
The house wrap acts as a barrier against drafts and moisture, while insulated doors and windows are caulked and screwed to securely seal openings and minimize heat transfer. 
 MEP Phase – Insitebuilders
The trim and siding acts as a hard shell to protect the walls in the same way the metal roofing protects the waterproof membrane. The siding is made from a cement based fiber that is long lasting and durable, reducing maintenance, and increasing the product’s life-cycle.
MEP Phase – Insitebuilders
Metal roofing is manufactured from high recycle content steel, coated at the factory to prevent corrosion, and pre-painted to provide a reflective coating that reduces cooling loads in warmer regions or absorbs heat in colder climates.
 MEP Phase – Insitebuilders
The resulting enclosure is long lasting and durable with a service life that will minimize maintenance, repairs, and future replacements.  

Now for human comfort
Mechanical, electrical, and plumbing (MEP) systems add comfort to the house by supplying water, removing waste, providing heat, ventilation, cooling, and electrical power.

They are installed in the following order:

1. Plumbing

MEP Phase – Insitebuilders
The pipes and fixtures supply water and gas and remove waste from the house. Because this includes large diameter pipes and fittings, the bulk of the plumbing is roughed-in to the framing before the other systems are installed.  

2. Mechanical 

 MEP Phase – Insitebuilders
Heating, ventilating, and air conditioning systems use a combination of air handlers and compressors to distribute conditioned air into the building and vent out moisture and contamination. Indoor air quality depends on the efficiency of the balance and correct capacity of the components of this system.

3. Electrical

MEP Phase – Insitebuilders
Human comfort depends on a well designed electrical installation. This includes dedicated circuits, receptacles, lighting, and controls as well as telecommunication wiring. Because wiring for these devices can be easily damaged, the electrical components are the last to be roughed-in to the framing.

Note that experienced construction managers overlap and carefully coordinate the MEP installations as simultaneous tasks to speed the scheduled completion.


 (To be continued…)  

---------------------------  
The material presented in this series has been taken from our book, “How a House is Built: With 3D Construction Models” The book includes annotated illustrations, captioned text, videos, models, and the 2D Preliminaries.
Insitebuilders.com

Tuesday, July 19, 2016

Part 41: Metal Roof with Concealed Fasteners

The last step in the Close-In Phase (the shell) begins once the flashing is complete and the work area is ready to start cutting roofing panels. Metal roofing with concealed fasteners is considered by many to be more aesthetically pleasing, but there are applications when exposed fasteners are more practical.
Close-In Phase – Insitebuilders
This includes buildings where additions or future changes are anticipated that will require removing roofing panels. Metal roofing with exposed fasteners are also easier to install and require no special tools or hardware.
Metal roofing with exposed fasteners
Once the underlying flashing is complete, the roofing panels are cut and mounted either directly to the roof deck or to furring strips laid over the temporary roofing membrane.
Close-In Phase – Insitebuilders
When weather conditions are either extremely cold or hot, the furring strips create an air space that prevents direct heat transfer from the metal panels through the sheathing to the interior. This air space also helps to prevent heat loss from the interior to the metal surface that causes ice dams from melting snow.

Rigid insulation is applied to the roof deck when batt or blown insulation is not installed in the attic or space between the ceiling joist and rafters.
Close-In Phase – Insitebuilders
Special roofing screws with EDPM washers penetrate the high point of the metal roofing, spaced according to manufacturer specifications, and engineered to counter uplift from wind loads.
Close-In Phase – Insitebuilders
The screws are long enough to secure the roofing panels, flashing, and the furring and rigid insulation, if used. Building codes require the screws to fully penetrate the roof sheathing so that the threads of their tips are visible for inspection from the interior.
Close-In Phase – Insitebuilders
Once the roofing is complete, exterior finishes and sitework are finalized. This includes touch up for prepainted trim, siding, and flashing as well as finish sitework, landscaping, vents, screens, and skirts around the pier foundation.
Sitework and landscaping that includes sprays, dust, insecticides, or other chemicals are always coordinated with the interior subcontractors to prevent contaminants from entering the building. “NO SMOKING” signs are also posted at all entries before the interior work begins.

 
(To be continued…)
--------------------------- 
The material presented in this series has been taken from our book, “How a House is Built: With 3D Construction Models” The book includes annotated illustrations, captioned text, videos, models, and the 2D Preliminaries.
 
Insitebuilders.com

Tuesday, June 21, 2016

Part 40: Metal Roof with Concealed Fasteners

(Introduction, Syllabus, 1.Prelims, 1-4Precon, 2. Excavation, 3.Foundation, 4.Framing, 5.Close-In, 6.Roofing, 7.MEP, 8.Finish)

Unless there are interior finishes, furnishings, or materials that require protection earlier in the schedule, the finished roofing is the last step in the close-in process.
Close-In Phase – Insitebuilders
Timing depends on when mechanical and electrical rough-in is scheduled, since roof and wall penetrations are often necessary for vents, intake, and outflow lines that extend through the roof from the walls and ceilings.
The roof flashing
A professional roofing contractor begins work by setting up the site and the rooftop for the work. This includes the installation of toe boards, chicken ladders on steep slope roofs, and tie off points for personal fall protection.
Close-In Phase – Insitebuilders
Local building codes do not specify safety procedures for roofing contractors, but the United States Department of Labor, Occupational Safety & Health Administration requires fall protection on residential roofs for employees working six or more feet above a lower level (See Fall Protection in Residential Construction).
Roof flashing is a flattened fiber, elastomer polymer (EPDM), or sheet metal material shaped to prevent leaks by covering the joints, edges, and angles of the roof, especially where the roof comes in contact with a vertical surface that comes “through the roof.”
Close-In Phase – Insitebuilders
The flashing for metal roofs with concealed fasteners is an integral part of the roofing system and installed with proprietary methods, tools, and clips to ensure a secure seal. 
Close-In Phase – Insitebuilders
Note that the roofing contractor will coordinate their work with the other trades to fit siding, trim, and other exterior finish materials over or under the roof flashing.
See the Metal Roofing Alliance website for information on different types of metal roofing, detailed specifications, and expert advice.
Metal Roofing with concealed fastener
A galvanized metal roof with concealed fasteners provides a seamless seal against moisture penetration, reducing energy costs and providing a much longer life cycle than other types of roofing. Color choices depend on climate and site conditions, white is the most reflective, while darker colors will absorb more solar energy.
Close-In Phase – Insitebuilders
The concealed fasteners anchor the metal panels to roof sheathing or furring strips depending on insulation requirements and local conditions.
The clips are screwed to the roof structure with tabs that bend over the panel edges, and are snapped to battens extruded in the panels. Once snapped into place, the roofing system is secure against wind loads, icing, and other weather related problems.
Close-In Phase – Insitebuilders
The installation of metal roofing is most efficient on houses with simple roofs, but there are a variety of special pieces that can be used to accommodate almost any configuration when the system is installed by a professional roofing contractor.

(To be continued…)
---------------------------
The material presented in this series has been taken from our book, “How a House is Built: With 3D Construction Models” The book includes annotated illustrations, captioned text, videos, models, and the 2D Preliminaries.
insitebuilders.com
.

Wednesday, May 18, 2016

Part 39: Sunroom and Skylights

(Introduction, Syllabus, 1.Prelims, 1-4Precon, 2. Excavation, 3.Foundation, 4.Framing, 5.Close-In, 6.Roofing, 7.MEP, 8.Finish)

To minimize the possibility of damage from overhead work, the sunroom and skylights are installed before the roofing and after the clerestory and siding have been completed.
Close-In Phase – Insitebuilders
Installing a custom sunroom 
Most sunrooms are available as kits with screens and glass set in an aluminum or vinyl frame (see the Better Living Guide to Sunrooms). These kits are sold by authorized contractors and are by far the easiest way to install a sunroom.
In this example, a custom-made sunroom is field constructed by skilled finish carpenters to fit an existing opening. Note that local codes may require detailed engineering drawings or specific factory labeling, indicating test results for positive and negative design pressures.
Close-In Phase – Insitebuilders
The frame must be weather resistant, carefully joined, and treated with a sealant and stained or painted before the glass is installed. In most climates, a clear, vertical grain pressure treated wood or composite, similar to that used for exterior decking, is the best choice for the framing material.
Close-In Phase – Insitebuilders
The rafters and stops are routed to secure the glass and are spaced to match the size of standard insulated and tempered glass panels. These panels are similar to those used for window walls in commercial buildings and are sourced from the same suppliers.
Installing the skylights  
Skylights are often specified to replace windows in small rooms that require daylight and natural ventilation and are manufactured to meet energy and building code requirements.
Close-In Phase – Insitebuilders
Operable skylights must be placed away from nearby plumbing and exhaust vents to prevent cross contamination and the intake of harmful gases. Required distances are governed by local building codes.

When the unit is ready to be bolted to a curb that was built around the opening in the roof, flashing is installed by the roofing contractor, and the prefabricated flanges of the skylight frame are set to counterflash the roofing material and seal the opening.
Close-In Phase – Insitebuilders
As an alternative, flush mounted skylights are available to avoid ice or debris buildup against the curb, improve energy efficiency, and lower the visual profile of the unit on the roof (See especially www.velux.com).
.
.
(To be continued…)
---------------------------
The material presented in this series has been taken from our book, “How a House is Built: With 3D Construction Models” The book includes annotated illustrations, captioned text, videos, models, and the 2D Preliminaries.
Insitebuilders.com
.
.